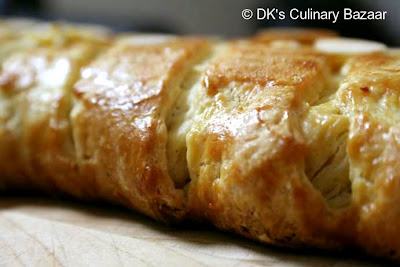
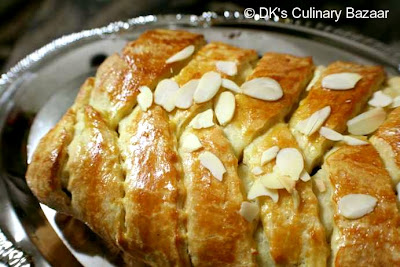
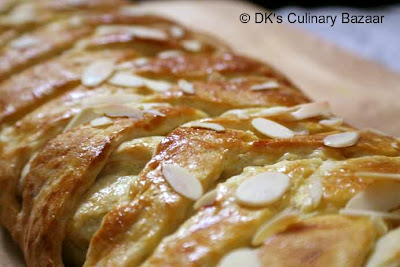
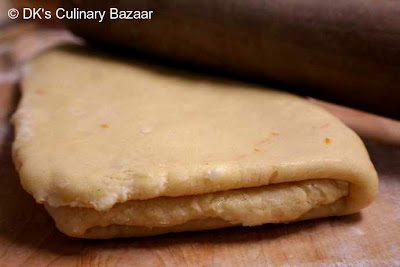
This one was almost not going to be - Well what else can I say - I waited till the last minute and that's literally - since I finished this challenge right now - just 2 hrs before the D day! - but then finished it nevertheless and Oh Boy! Am I glad! This is one of the amazing exp ever. Danish Braid was the challenge set by Kelly of Sass & Veracity and Ben of What’s Cookin’? . I have never made a laminated dough before - this opens up plethora of opportunities for me - and it tasted heavenly. I esp had a tough time keeping my hands off the apple filling. It was too darn yummy and worth every single lick of the spoon! :) The whole process went without a hiccup and I had a wonderful time through out. All that hard work on the danish dough was worth every single second and muscle work that I had to put through.

Ingredients
    For the dough (Detrempe)
  • 1 ounce fresh yeast or 1 tablespoon active dry yeast
  • 1/2 cup whole milk
  • 1/3 cup sugar
  • Zest of 1 orange, finely grated
  • 3/4 teaspoon ground cardamom
  • 1-1/2 teaspoons vanilla extract
  • 1/2 vanilla bean, split and scraped
  • 2 large eggs, chilled
  • 1/4 cup fresh orange juice
  • 3-1/4 cups all-purpose flour
  • 1 teaspoon salt
    For the butter block (Beurrage)
  • 1/2 pound (2 sticks) cold unsalted butter
  • 1/4 cup all-purpose flour
    APPLE FILLING
  • 4 Fuji or other apples, peeled, cored, and cut into ¼-inch pieces
  • 1/2 cup sugar
  • 1 tsp. ground cinnamon
  • 1/2 vanilla bean, split and scraped
  • 1/4 cup fresh lemon juice
  • 4 tablespoons unsalted butter
    DANISH BRAID (Makes enough for 2 large braids)
  • 1 recipe Danish Dough (see above)
  • 2 cups apple filling, jam, or preserves (recipe above)
  • For the egg wash: 1 large egg, plus 1 large egg yolk
Method
1. Combine yeast and milk in the bowl of a mixer fitted with the paddle attachment and mix on low speed. Slowly add sugar, orange zest, cardamom, vanilla extract, vanilla seeds, eggs, and orange juice. Mix well. Change to the dough hook and add the salt with the flour, 1 cup at a time, increasing speed to medium as the flour is incorporated.
2. Knead the dough for about 5 minutes, or until smooth. You may need to add a little more flour if it is sticky. Transfer dough to a lightly floured baking sheet and cover with plastic wrap. Refrigerate for 30 minutes. Without a standing mixer: Combine yeast and milk in a bowl with a hand mixer on low speed or a whisk. Add sugar, orange zest, cardamom, vanilla extract, vanilla seeds, eggs, and orange juice and mix well. Sift flour and salt on your working surface and make a fountain. Make sure that the “walls” of your fountain are thick and even. Pour the liquid in the middle of the fountain. With your fingertips, mix the liquid and the flour starting from the middle of the fountain, slowly working towards the edges. When the ingredients have been incorporated start kneading the dough with the heel of your hands until it becomes smooth and easy to work with, around 5 to 7 minutes. You might need to add more flour if the dough is sticky.
3. BUTTER BLOCK 1. Combine butter and flour in the bowl of a mixer fitted with a paddle attachment and beat on medium speed for 1 minute. Scrape down the sides of the bowl and the paddle and then beat for 1 minute more, or until smooth and lump free. Set aside at room temperature. 2. After the detrempe has chilled 30 minutes, turn it out onto a lightly floured surface. Roll the dough into a rectangle approximately 18 x 13 inches and ¼ inch thick. The dough may be sticky, so keep dusting it lightly with flour. Spread the butter evenly over the center and right thirds of the dough. Fold the left edge of the detrempe to the right, covering half of the butter. Fold the right third of the rectangle over the center third. The first turn has now been completed. Mark the dough by poking it with your finger to keep track of your turns, or use a sticky and keep a tally. Place the dough on a baking sheet, wrap it in plastic wrap, and refrigerate for 30 minutes.
4. 3. Place the dough lengthwise on a floured work surface. The open ends should be to your right and left. Roll the dough into another approximately 13 x 18 inch, ¼-inch-thick rectangle. Again, fold the left third of the rectangle over the center third and the right third over the center third. No additional butter will be added as it is already in the dough. The second turn has now been completed. Refrigerate the dough for 30 minutes. 4. Roll out, turn, and refrigerate the dough two more times, for a total of four single turns. Make sure you are keeping track of your turns. Refrigerate the dough after the final turn for at least 5 hours or overnight. The Danish dough is now ready to be used. If you will not be using the dough within 24 hours, freeze it. To do this, roll the dough out to about 1 inch in thickness, wrap tightly in plastic wrap, and freeze. Defrost the dough slowly in the refrigerator for easiest handling. Danish dough will keep in the freezer for up to 1 month.
5. Toss all ingredients except butter in a large bowl. Melt the butter in a sauté pan over medium heat until slightly nutty in color, about 6 - 8 minutes. Then add the apple mixture and sauté until apples are softened and caramelized, 10 to 15 minutes. If you’ve chosen Fujis, the apples will be caramelized, but have still retained their shape. Pour the cooked apples onto a baking sheet to cool completely before forming the braid. (If making ahead, cool to room temperature, seal, and refrigerate.) They will cool faster when spread in a thin layer over the surface of the sheet. After they have cooled, the filling can be stored in the refrigerator for up to 3 days. Left over filling can be used as an ice cream topping, for muffins, cheesecake, or other pastries.
6. 1. Line a baking sheet with a silicone mat or parchment paper. On a lightly floured surface, roll the Danish Dough into a 15 x 20-inch rectangle, ¼ inch thick. If the dough seems elastic and shrinks back when rolled, let it rest for a few minutes, then roll again. Place the dough on the baking sheet. 2. Along one long side of the pastry make parallel, 5-inch-long cuts with a knife or rolling pastry wheel, each about 1 inch apart. Repeat on the opposite side, making sure to line up the cuts with those you’ve already made. 3. Spoon the filling you’ve chosen to fill your braid down the center of the rectangle. Starting with the top and bottom “flaps”, fold the top flap down over the filling to cover. Next, fold the bottom “flap” up to cover filling. This helps keep the braid neat and helps to hold in the filling. Now begin folding the cut side strips of dough over the filling, alternating first left, then right, left, right, until finished. Trim any excess dough and tuck in the ends.
7. Whisk together the whole egg and yolk in a bowl and with a pastry brush, lightly coat the braid. Proofing and Baking 1. Spray cooking oil (Pam…) onto a piece of plastic wrap, and place over the braid. Proof at room temperature or, if possible, in a controlled 90 degree F environment for about 2 hours, or until doubled in volume and light to the touch. 2. Near the end of proofing, preheat oven to 400 degrees F. Position a rack in the center of the oven. 3. Bake for 10 minutes, then rotate the pan so that the side of the braid previously in the back of the oven is now in the front. Lower the oven temperature to 350 degrees F, and bake about 15-20 minutes more, or until golden brown. Cool and serve the braid either still warm from the oven or at room temperature. The cooled braid can be wrapped airtight and stored in the refrigerator for up to 2 days, or freeze for 1 month.

Related Posts

Leave a Reply

I love to hear from you! I read each and every comment, and will get back as soon as I am able to.
Did you try this recipe? Please share your feedback!
Upload Your Recipe Photos

37 Comments

By recipes | Pearltrees on Mar 10, 2012

[...] How to make Danish Braid Recipe | Classic Apple Danish Recipe | Chef In You 4 3. Place the dough lengthwise on a floured work surface. The open ends should be to your right and left. Roll the dough into another approximately 13 x 18 inch, ¼-inch-thick rectangle. [...]

By donpin on Jan 6, 2012

I would love to try this out but i wish you had more photographs of the different stages of assembly.

By Eve on Jul 21, 2011

So I wanted to know if there was a way to substitute the milk , butter, and egg for something that would make the recipe vegan?

By Ben on Jul 4, 2008

You did an amazing job on this challenge. Thank you for baking with us :)

By Claire on Jul 2, 2008

Great job! I had a hard time not snacking on my peach filling as well.

By Jen Yu on Jul 2, 2008

That looks terrific. You did such a nice job on this - especially since you waited until the last minute. I am SO impressed!

By Ranjani on Jul 1, 2008

GORGEOUS! Really looks like a masterpiece!

By Uma on Jun 30, 2008

beautiful braid! hats off Dhivya! BTW you have something in my blog. Check it out here:

http://teluguruchi.blogspot.com/2008/06/all-in-one-prizes-awards-and-meme.html

Hope you like it!

By Dolores on Jun 30, 2008

Gotta love a hiccup-less daring baker challenge. I'm glad you found the resources to bake this one... it's turned out to be one of my very favorite challenges to date. Great job!

By breadchick on Jun 30, 2008

Well done, you SHOULD be proud!!

By Kalai on Jun 30, 2008

Dhiviiiiiii!!! Super-a irukku!! I'm totally coming over to eat the rest of it! Absolutely amazing braid, dear! :)

By Shilpa on Jun 30, 2008

Thats beautiful DK. I am too scared of leaving the challenge till last moment :(

By seamaiden on Jun 30, 2008

That is one beautiful braid! Very nicely done and thanks for coming by my site!

-Sea

By Meeta on Jun 30, 2008

DK! Perfect braid and well done on mastering this. Perfect!

By Tarah on Jun 29, 2008

Awesome job on this months challenge!

By Nags on Jun 29, 2008

that looks so pretty! great job :)

By Rachel on Jun 29, 2008

Wow...You defintely have reasons to be proud of your praid..I love the serrated edges that you gave your strips...Nice job!!

By Liz on Jun 29, 2008

Your braid is great! I like the almonds - they add a wonderful touch to the braid. Ejoy! Liz

By Namratha on Jun 29, 2008

Wow Dhivya, this looks awesome...well done! :)The braid looks good. Ahh tell me about the last minute thing, I did mine in the nth moment too :P

By sunita on Jun 29, 2008

DK, you've done well...your braid has come out beautifully :-)

By Dee on Jun 29, 2008

DK, the pictures are stunning, the braid looks fantastic. Im so proud of your achievements!! I wouldnt even go there , because I will be definitely convinced that I cant do it.

By Faery on Jun 29, 2008

The braid looks delicious and beautiful, a fabulous braid

By Hetal on Jun 29, 2008

You are just too good,perfect braids and a lovely recipe.

By Madhuram on Jun 29, 2008

Wow DK it's truly amazing, stunning. I think I'm still in pre-school and you have become a master in baking. Gorgeous!

By Siri on Jun 29, 2008

thats one beautiful piece of lamination da..and quite some hardwork involved huh!..Love all the pics! and wish I was there with u.. to have a piece of the yummy bread!

Hugs,
Siri

By Arundathi on Jun 29, 2008

omg girl!! you are amazing! :-) that looks nothing less than perfect! i can just imagine how good that must've been!

By Clumbsy Cookie on Jun 29, 2008

You should be proud! Well done!

By Divya Vikram on Jun 29, 2008

Dhivya..looks gorgeous dear..You have braided it too beautifully..Hats off to u..

By Srivalli on Jun 29, 2008

OMG Dhivi..thats fabulous!!!...gosh its mean da..that you are enjoying all by yourself!!!..of course with karthick I hope..hehehh

By KALVA on Jun 29, 2008

Wow.. i can the hardwork you put in the danish braid.. looks great dear

By Aparna on Jun 29, 2008

You should be happy, that's one very lovely braided Danish. Especially as you just met the deadline.
I have a tendency to mess up things when I'm pushed to a corner.:)

By Candace on Jun 29, 2008

Lovely job on this challenge and nice pics!

By Marc @ NoRecipes on Jun 29, 2008

Nicely done! Especially given the last minute nature:-)

By Jenny on Jun 29, 2008

Your braid looks perfect. I haven't posted mine quite yet, I'm reading the early posters while waiting for mine to proof. I love the edges of your pastry cuts in particular!

By Jeanine on Jun 29, 2008

What a beautiful Danish Braid! I can nearly smell it from here. :)

By giz on Jun 29, 2008

Your braid is wonderful. I really love the almonds on the top - it has that French patisserie look to it and I doubt you'd find anything nicer in the finest of bakeries. Well done.

By Sunshinemom on Jun 29, 2008

DK, that looks great and you are right to be proud about it! I skipped this time due to ...oh lots of reasons!