Hungarian Dobos Torte (step by step pictorial)
The August 2009 Daring Bakers' challenge was hosted by Angela of A Spoonful of Sugar and Lorraine of Not Quite Nigella. They chose the spectacular Dobos Torte based on a recipe from Rick Rodgers' cookbook Kaffeehaus:  Exquisite Desserts from the Classic Caffés of Vienna, Budapest, and Prague. I have been lovingly (and generously, I must say!) been called as Baking Queen by loved ones. I, of course very humbly and unabashedly accepted the title. This is where the concept of foot in the mouth syndrome occurs. Give me any kind of breads in the world, ask me to use the oven on a day to day basis and I can with utmost interest treat you to new dishes on a daily basis. But ask me to bake a layered cake, talk to me about butter creams, frostings, icings, torte's and you will find me subjected to an invisible "Petrificus Totalus" spell.
Hungarian Dobos Torte (step by step pictorial)
I almost missed this months challenge citing various reasons. Week -1 1) Too much work - no time to sit for a WHOLE day in the kitchen ( "would you say the same thing if you were given some type of bread!" - asked my too-smart-for-my-own-good husband) Week - 2 2) How about this - Too MANY eggs - 10 Eggs! you got to be kidding me, too eggy for me. ("yet you gobbled up these butter cookies. I am sure the chocolate will mask the egg taste" - yes HIM again (#$$#%T#$)) Week - 3 3) I am on a DETOX diet - can't be eating so much butter (2 sticks!) and look at that chocolate ("Don't worry - you dont have to - I will take it to work!"- what? isnt it obvious now to who said that ! ($@#$$)) Week - 4 4) aah..(splutter)..huh! OK OK I give up..I accept defeat! I can't Bake TORTE for the life of me - leave alone something called as Dobos Torte. I can bake anything else..not anything too sweet!~ I am NOT going to ( "Oh well- ok then! But this is Daring Bakers- its not for those who Bake only what they like and can. Its for those who can't do it with flair too - that's why its CHALLENGE! Otherwise what's the point. " - smart pants!) On the day of the challenge post - yes TODAY Ok then - I will try and if its a mess don't laugh at me ( "of course I won't. As long as you try- that's all matters!" - My encouraging husband :)) So as mentioned, it was not a hit in the looks department - but it tasted too good though. What more it dint taste eggy at all - the rich chocolate butter cream ruled the roost. Since I had to post it soon, I dint have time to set it first in the fridge for the specified time. But before I go into the recipe "YAYYYYYYYYYYYY! I ACTUALLY MADE A YUMMY TASTING TORTE" *Update : After setting it in the fridge for 2 hours, its now even more delicious to cut and also to taste. The layers are more prominent now - but too late to take photos yet again! I am tired!* Hungarian Dobos Torte (step by step pictorial) Now to Notes from the Daring Baker's Challenge 
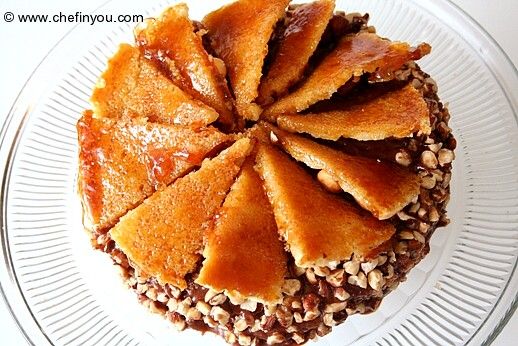
The Dobos Torta is a five-layer sponge cake, filled with a rich chocolate buttercream and topped with thin wedges of caramel. (You may come across recipes which have anywhere between six and 12 layers of cake; there are numerous family variations!) It was invented in 1885 by József C. Dobos, a Hungarian baker, and it rapidly became famous throughout Europe for both its extraordinary taste and its keeping properties. The recipe was a secret until Dobos retired in 1906 and gave the recipe to the Budapest Confectioners' and Gingerbread Makers' Chamber of Industry, providing that every member of the chamber can use it freely. Lorraine and I would like you to make this famous cake which we chose in the spirit of being Daring and Challenging us. Variations are discussed at the end of this post and as always, if you have to make substitutions for dietary or financial reasons, that is fine.
  • Cook time:
  • Prep time:
  • Yields: Makes one 8 inch (6 layer) torta
Ingredients
  • Sponge cake layers
  • 6 large eggs, separated, at room temperature
  • 1 1/3 cups (162g) confectioner's (icing) sugar, divided
  • 1 teaspoon (5ml) vanilla extract
  • 1 cup plus 2 tablespoons (112g) sifted cake flour (SUBSTITUTE 95g plain flour + 17g cornflour (cornstarch) sifted together)
  • pinch of salt
  • Chocolate Buttercream
  • 4 large eggs, at room temperature
  • 1 cup (200g) caster (ultrafine or superfine white) sugar
  • 4oz (110g) bakers chocolate or your favourite dark chocolate, finely chopped
  • 2 sticks plus 2 tablespoons (250g) unsalted butter, at room temperature.
  • Caramel topping
  • 1 cup (200g) caster (superfine or ultrafine white) sugar
  • 12 tablespoons (180 ml) water
  • 8 teaspoons (40 ml) lemon juice
  • 1 tablespoon neutral oil (e.g. grapeseed, rice bran, sunflower)
Method
1.

Directions for the sponge layers:

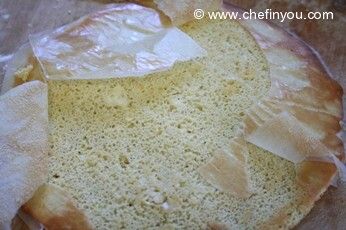
The sponge layers can be prepared in advance and stored interleaved with parchment and well-wrapped in the fridge overnight.

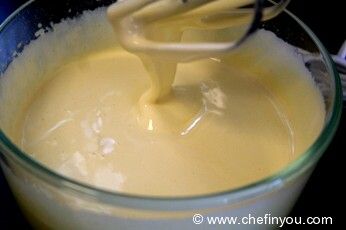
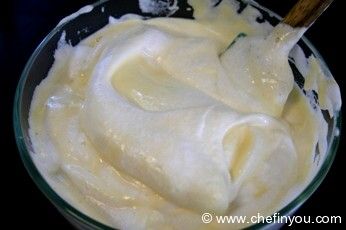
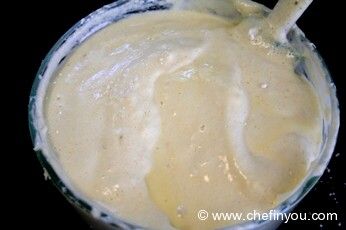
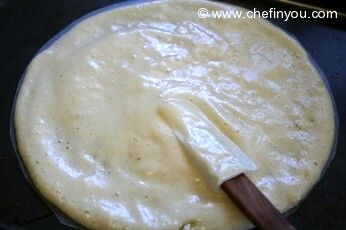
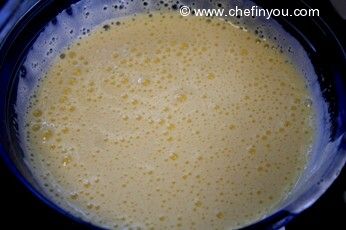
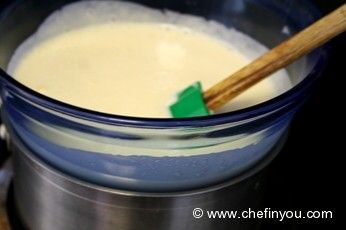
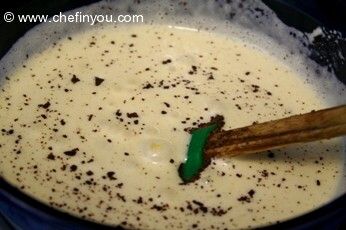
Position the racks in the top and centre thirds of the oven and heat to 400F (200C). Cut six pieces of parchment paper to fit the baking sheets. Using the bottom of a 9" (23cm) springform tin as a template and a dark pencil or a pen, trace a circle on each of the papers, and turn them over (the circle should be visible from the other side, so that the graphite or ink doesn't touch the cake batter.)Beat the egg yolks, 2/3 cup (81g) of the confectioner's (icing) sugar, and the vanilla in a medium bowl with a mixer on high speed until the mixture is thick, pale yellow and forms a thick ribbon when the beaters are lifted a few inches above the batter, about 3 minutes. (You can do this step with a balloon whisk if you don't have a mixer.)

2. In another bowl, using clean beaters, beat the egg whites until soft peaks form.
3. Gradually beat in the remaining 2/3 cup (81g) of confectioner's (icing)sugar until the whites form stiff, shiny peaks. Using a large rubber spatula, stir about 1/4 of the beaten whites into the egg yolk mixture, then fold in the remainder, leaving a few wisps of white visible.
4. Combine the flour and salt. Sift half the flour over the eggs, and fold in; repeat with the remaining flour.
5. Line one of the baking sheets with a circle-marked paper. Using a small offset spatula, spread about 3/4cup of the batter in an even layer, filling in the traced circle on one baking sheet.
6. Bake on the top rack for 5 minutes, until the cake springs back when pressed gently in the centre and the edges are lightly browned.
7. While this cake bakes, repeat the process on the other baking sheet, placing it on the centre rack. When the first cake is done, move the second cake to the top rack. Invert the first cake onto a flat surface and carefully peel off the paper.
8. Slide the cake layer back onto the paper and let stand until cool. Rinse the baking sheet under cold running water to cool, and dry it before lining with another parchment. Continue with the remaining papers and batter to make a total of six layers. Completely cool the layers. Using an 8" springform pan bottom or plate as a template, trim each cake layer into a neat round. (A small serrated knife is best for this task.)
9.

Directions for the chocolate buttercream:

NB. This can be prepared in advance and kept chilled until required.

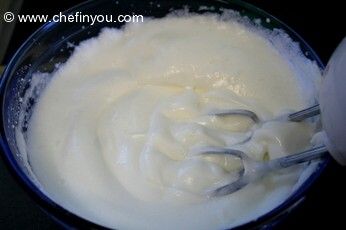
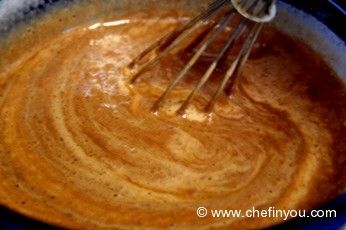
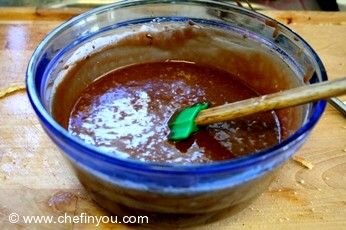
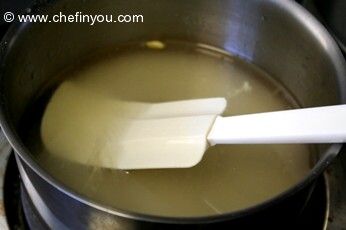
Prepare a double-boiler: quarter-fill a large saucepan with water and bring it to a boil.Meanwhile, whisk the eggs with the sugar until pale and thickened, about five minutes. You can use a balloon whisk or electric hand mixer for this.

10. Fit bowl over the boiling water in the saucepan (water should not touch bowl) and lower the heat to a brisk simmer.
11. Cook the egg mixture, whisking constantly, for 2-3 minutes until you see it starting to thicken a bit. Whisk in the finely chopped chocolate and cook, stirring, for a further 2-3 minutes.
12. Scrape the chocolate mixture into a medium bowl and leave to cool to room temperature. It should be quite thick and sticky in consistency.
13. When cool, beat in the soft butter, a small piece (about 2 tablespoons/30g) at a time. An electric hand mixer is great here, but it is possible to beat the butter in with a spatula if it is soft enough. You should end up with a thick, velvety chocolate buttercream.
14.

Chill while you make the caramel topping.

Lorraine's note: If you're in Winter just now your butter might not soften enough at room temperature, which leads to lumps forming in the buttercream. Male sure the butter is of a very soft texture I.e. running a knife through it will provide little resistance, before you try to beat it into the chocolate mixture. Also, if you beat the butter in while the chocolate mixture is hot you'll end up with more of a ganache than a buttercream!

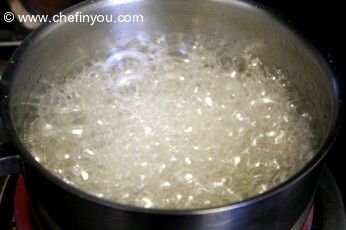
Directions for the caramel topping:

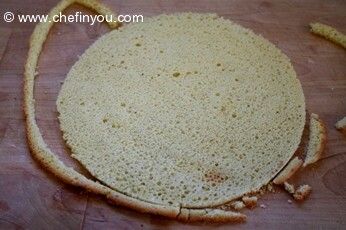
Choose the best-looking cake layer for the caramel top.

To make the caramel topping: Line a jellyroll pan withparchment paper and butter the paper. Place the reserved cake layer on the paper.

15. Score the cake into 12 equal wedges. Lightly oil a thin, sharp knife and an offset metal spatula. 2.Stir the sugar, water and lemon juice in a small saucepan. Bring to a boil over a medium heat, stirring often to dissolve the sugar.
16. Once dissolved into a smooth syrup, turn the heat up to high and boil without stirring, swirling the pan by the handle occasionally and washing down any sugar crystals on the sides of the pan with a wet brush until the syrup has turned into an amber-coloured caramel.
17. The top layer is perhaps the hardest part of the whole cake so make sure you have a oiled, hot offset spatula ready. I also find it helps if the cake layer hasn't just been taken out of the refrigerator. I made mine ahead of time and the cake layer was cold and the toffee set very, very quickly—too quickly for me to spread it.
18. Immediately pour all of the hot caramel over the cake layer. You will have some leftover most probably but more is better than less and you can always make nice toffee pattern using the extra to decorate. Using the offset spatula, quickly spread the caramel evenly to the edge of the cake layer. Let cool until beginning to set, about 30 seconds. Using the tip of the hot oiled knife (keep re-oiling this with a pastry brush between cutting), cut through the scored marks to divide the caramel layer into 12 equal wedges. Cool another minute or so, then use the edge of the knife to completely cut and separatethe wedges using one firm slice movement (rather than rocking back and forth which may produce toffee strands). Cool completely.
19.

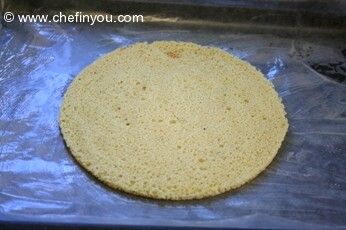
Angela's note: I recommend cutting, rather than scoring, the cake layer into wedges before covering in caramel (reform them into a round). If you have an 8” silicon round form, then I highly recommend placing the wedges in that for easy removal later and it also ensures that the caramel stays on the cake layer. Once set, use a very sharp knife to separate the wedges.

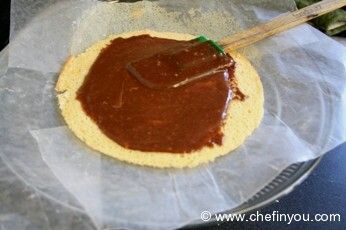
Assembling the Dobos

Divide the buttercream into six equal parts.Place a dab of chocolate buttercream on the middle of a 7 1/2” cardboard round and top with one cake layer. Spread the layer with one part of the chocolate icing.

20. Repeat with 4 more cake layers. Spread the remaining icing on the sides of the cake. 3.Optional: press the finely chopped hazelnuts onto the sides of the cake. 4.Propping a hazelnut under each wedge so that it sits at an angle, arrange the wedges on top of the cake in a spoke pattern. If you have any leftover buttercream, you can pipe rosettes under each hazelnut or a large rosette in the centre of the cake. Refrigerate the cake under a cake dome until the icing is set, about 2 hours. Let slices come to room temperature for the best possible flavour. Storage I (Angela) am quite happy to store this cake at room temperature under a glass dome, but your mileage may vary. If you do decide to chill it, then I would advise also using a glass dome if you have done. I should also note that the cake will cut more cleanly when chilled.

Filed Under these categories

Leave a Reply

I love to hear from you! I read each and every comment, and will get back as soon as I am able to.
Did you try this recipe? Please share your feedback!
Upload Your Recipe Photos

26 Comments

By klyna on Jul 4, 2013

I am Hungarian and it is not the original Dobos Torte, but I'll try your version as well. :) The top of the original Hungarian cake is "clearer" like this one http://beatrixcukraszda.hu/wp-content/uploads/2011/05/dobos-1024x685.jpg :)

By Adriana Dragomir on Apr 11, 2011

:wink: I try this at home it is ezzy and very good. Thankyou Love Adriana

By Yolanka Roskovics on Feb 28, 2011

I am prepring to make a Dobos Torte - haven't done one in years but am having a Hungarian dinner for my book club. My Nagymama made this cake every Sunday when I was a child. She always used Hazelnuts in the frosting/filling. Nagymama also would press Hazelnuts into the sides of the cake frosting. She also make the cake in a large rectangle shape as Anca discribed. Tastes the same - recipies are made to be expounded upon. Whatever way one is made everyone should give it a try at least once in their baking life. The only trouble one would have is the carmel topping.

By Angela on Dec 18, 2010

:wink: My husband is hungarian and I have been making this cake for 25 years. However - never had the step by step pics and inlaws can be snooty about sharing tips - so thank-you for the step-by-step. Your cake looks lovely. Our recipe is similar - you took the challenge well - congrats.

By Peter on May 8, 2010

While this is an excellent recipe, it is not a classic Hungarian dobos torte. As for Anca, Dobos tortes ARE round; always have been in Hungary and elsewhere. Classic dobos torte contains no nuts. The butter creme also uses a classic boiled sugar format for binding. It is generally a seven layer cake. Many of the elements of this cake are similar, they are just modified or used differently. Very nice recipe though.

Good to know. We were given this as part of a challenge hence I was not aware of the authenticity. Thanks for info :) --DK

By Zsolt Sesztak » Halászlé on Apr 15, 2010

[...] Dobos torta step by step [...]

By Zsolt Sesztak » Dobos torta on Apr 6, 2010

[...] Dobos torta step by step [...]

By Anca on Dec 13, 2009

Hi, I grew up in Transylvania where Dobos torte was a very common desert, yet, I have never seen it round. We always had it in a rectangular shape (that's also the shape I saw most commonly in Hungary). It is a lot easier to make as you can bake a large rectangular sheet on a big baking pan and then cut it in 2,3, or even 4 rectangles. This way you don't need to bake so many times nor to bother with trimming a circle in the paper and cake. The caramel top is then sliced across the length, also a bit easier than segments of a circle.

By nags on Aug 30, 2009

wow! seeing that step by step was kinda nice. Otherwise i just see pretty cakes on all blogs for DB :)

By meeso on Aug 30, 2009

These recipes make me realize I am NOT a baker, but I could really be a taste tester!

By paula on Aug 29, 2009

Thank you I love you your pictures too

By kitchenlander on Aug 29, 2009

So, why are you complaining about the looks? Looks perfectly fine to me! I kinda have the same conversations before a challenge, here: only, with a little voice in my head, my husband doesn't keep track, he only appreciates whatevere he's presented with!

By Simran on Aug 28, 2009

Hey! I was scared going into this recipe too. But it tasted great :)

By sarah on Aug 28, 2009

Love the Harry Potter reference! Great looking torte.

By Ramya Kiran on Aug 28, 2009

Good work! The torte looks beautiful.

By CookiePie on Aug 28, 2009

I think yours came out beautiful!! Great job!

By Parita on Aug 28, 2009

Wow thats delectable DK! love your step by step pictures, i too made my first DB challenge but was too lazy to take step by step clicks...do visit if you find time :)

By sunita on Aug 28, 2009

Late or ot, the torta looks lovely, Dhivs. I was huffing and puffing at the last moment too :-)

By Priya on Aug 27, 2009

Such a delectable torte, seriously they turned out prefect and fabulous DK!

By PJ on Aug 27, 2009

Yesterday my lil angel wanted your paneer mutter roti,today she wants this!!!What do I do?Mind passing us a portion ;)..Yummy looking dobos torta...

By Tartelette on Aug 27, 2009

Right on time! Your torte turned out beautiful!

By Jill on Aug 27, 2009

Great step-by-step photos!! Your torta turned out beautiful and you did a great job on this challenge! :)

By Chakh...le...Re!!! on Aug 27, 2009

Thanks for the step by step recipe!! The cake looks gorgeous.

By Soma on Aug 27, 2009

Late or not.. this looks absolutely gorgeous!

By Divya on Aug 27, 2009

You were worrying unnecessarily:).The DB challenge has come out spectacular for you.Lovely pics of the step by step process,to be honest,it is now that I truly understood how the torta is made,esp the caramel part.Though I have no plans whatsoever to"try this at home",if I ever do,I'll come back here:)

By Julie on Aug 27, 2009

I guess husbands can be pesky sometimes, but I'm glad yours pestered you! Turned out great!! Hilarious post :)