Gluten Free Nanaimo Bars by DK on Jan 27, 2010
 Recipe")
The January 2010 Daring Bakers’ challenge was hosted by Lauren of Celiac Teen. Lauren chose Gluten-Free Graham Wafers and Nanaimo Bars as the challenge for the month. The sources she based her recipe on are 101 Cookbooks and www.nanaimo.ca.
OMG! In the name of sweet lord Jesus! Ok before regular readers get a culture shock hearing this from me, let me explain! I was given a fair warning by fellow dbers. They told me this was a rich dessert. I was neglectful and blase about it. I am not a chocoholic, why I even hate them (except for v few) hence did not think that this so called dessert with chocolates could suck up to my taste buds! But guess what? - I have been smacked left, right and center!
 Recipe")
 Recipe")
- Cook time:
- Prep time:
- Yields: Makes around 16 bars
- For Gluten-Free Graham Wafers
- 1 cup (138 g) (4.9 ounces) Sweet rice flour (also known as glutinous rice flour)
- 3/4 cup (100 g) (3.5 ounces) Tapioca Starch/Flour
- 1/2 cup (65 g) (2.3 ounces) Sorghum Flour
- 1 cup (200 g) (7.1 ounces) Dark Brown Sugar, Lightly packed
- 1 teaspoon (5 mL) Baking soda
- 3/4 teaspoon (4 mL ) Kosher Salt
- 7 tablespoons (100 g) (3 ½ ounces) Unsalted Butter (Cut into 1-inch cubes and frozen)
- 1/3 cup (80 mL) Honey, Mild-flavoured such as clover.
- 5 tablespoons (75 mL) Whole Milk
- 2 tablespoons (30 mL) Pure Vanilla Extract
- (Preparation time: Nanaimo Bars: 30 minutes.)
- Nanaimo Bars — Bottom Layer
- 1/2 cup (115 g) (4 ounces) Unsalted Butter
- 1/4 cup (50 g) (1.8 ounces) Granulated Sugar
- 5 tablespoons (75 mL) Unsweetened Cocoa
- 1 Large Egg, Beaten
- 1 1/4 cups (300 mL) (160 g) (5.6 ounces) Gluten Free Graham Wafer Crumbs (See previous rec ipe)
- 1/2 cup (55 g) (1.9 ounces) Almonds (Any type, Finely chopped)
- 1 cup (130 g) (4.5 ounces) Coconut (Shredded, sweetened or unsweetened)
- For Nanaimo Bars — Middle Layer
- 1/2 cup (115 g) (4 ounces) Unsalted Butter
- 2 tablespoons and 2 teaspoons (40 mL) Heavy Cream
- 2 tablespoons (30 mL) Vanilla Custard Powder (Such as Bird’s. Vanilla pudding mix may be substituted.)
- 2 cups (254 g) (8.9 ounces) Icing Sugar
- For Nanaimo Bars — Top Layer
- 4 ounces (115 g) Semi-sweet chocolate
- 2 tablespoons (28 g) (1 ounce) Unsalted Butter
Method - For the wafers
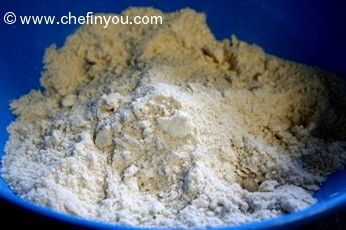
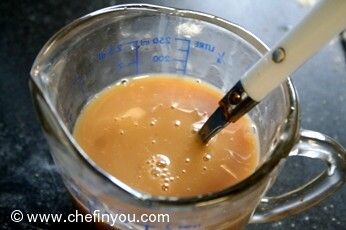
In the bowl of a food processor fitted with a steel blade, combine the flours, brown sugar, baking soda, and salt. Pulse on low to incorporate.


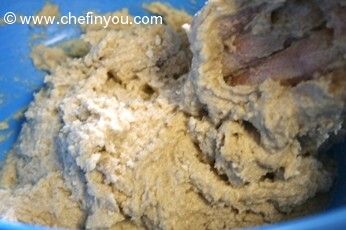
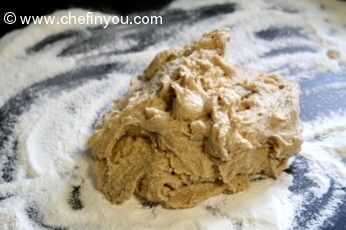
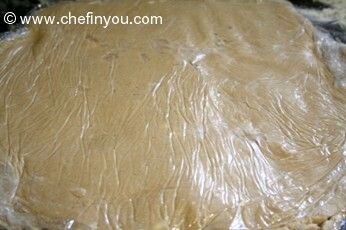
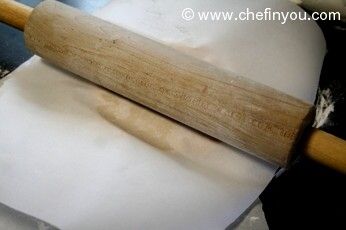
Divide the dough in half and return one half to the refrigerator. Sift an even layer of sweet rice flour onto the work surface and roll the dough into a long rectangle, about 1/8 inch thick. The dough will be quite sticky, so flour as necessary. Cut into 4 by 4 inch squares. Gather the scraps together and set aside. Place wafers on one or two parchment-lined baking sheets.
My Notes:
Mine were too sticky and I could not roll it on just floured surface. I placed it instead on a well floured Parchment paper. Placed another parchment paper on top and rolled the flour.

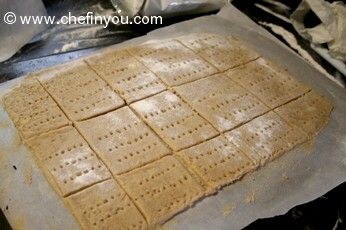

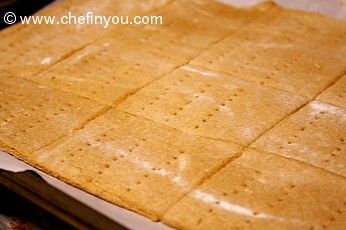
Bake for 25 minutes, until browned and slightly firm to the touch, rotating sheets halfway through to ensure even baking. Might take less, and the starting location of each sheet may determine its required time. The ones that started on the bottom browned faster.
When cooled completely, place enough wafers in food processor to make 1 ¼ cups (300 mL) of crumbs. Another way to do this is to place in a large ziplock bag, force all air out and smash with a rolling pin until wafers are crumbs.
Additional Information:
These bars freeze very well, so don’t be afraid to pop some into the freezer.The graham wafers may be kept in an airtight container for up to 2 weeks. Mine lasted about that long.If making the graham crackers with wheat, replace the gluten-free flours (tapioca starch, sweet rice flour, and sorghum flour) with 2 ½ cups plus 2 tbsp of all-purpose wheat flour, or wheat pastry flour. Watch the wheat-based graham wafers very closely in the oven, as they bake faster than the gluten-free ones, sometimes only 12 minutes.For the Nanaimo Bars, if making with wheat, replace the gluten-free graham wafer crumbs with equal parts wheat graham wafer crumbs!
Method - For the Bars
For bottom Layer:
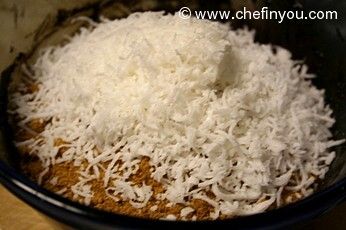
Melt unsalted butter, sugar and cocoa in top of a double boiler. Add egg and stir to cook and thicken. Remove from heat. Stir in crumbs, nuts and coconut.

For Middle Layer:
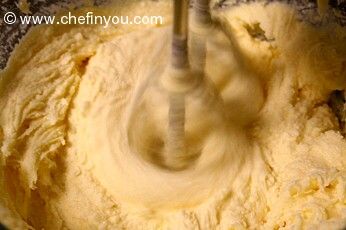
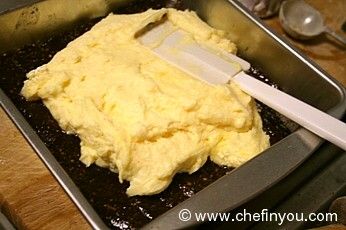
Cream butter, cream, custard powder, and icing sugar together well. Beat until light in colour.
For Top Layer:
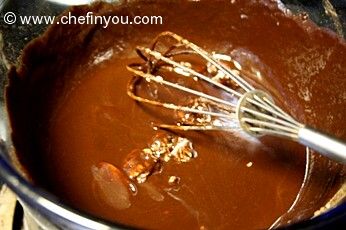
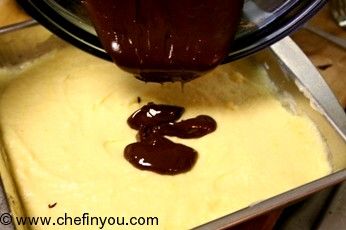
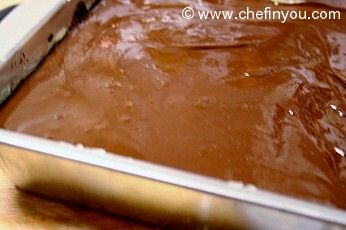
Melt chocolate and unsalted butter over low heat.
 Recipe")
Look at these beauties and tell me honestly - would you be able to resist something like these? Imagine my plight when I had to sit and take photos of them.......Uh huh! Not happening ppl!They almost got over pretty fast.
 Recipe")
- Notes for gluten-free Graham Wafers and Nanaimo Bars:
- Glutinous rice flour does not contain any gluten, as it is made from a type of rice called glutinous (or sweet) rice.
- The graham wafer dough is very sticky. Make sure you are flouring (with sweet rice flour) well, or the dough will be difficult to remove from the surface you roll it out on. Also be sure to keep it cold. You do not want the butter to melt.
- I chose these flours because of their availability. Tapioca starch/flour and sweet rice flour can often be found in Asian grocery stores, or in the Asian section of you grocery store. Sorghum can be slightly more difficult to find, but it can be replaced with brown rice flour, millet flour or other alternatives.
- In the Nanaimo Bars, it is very important that the chocolate be cool but still a liquid, otherwise the custard layer will melt, and it will mix with the chocolate, being difficult to spread. Allow the chocolate mixture to come to room temperature but not solidify before spreading the top layer on.
 Recipe")
- Fellow amazing daring baker Audax Artifex shares useful tips (dont forget to check out some amazing filling in his variations! Mind blowing!)
- The dough is very very soft so the best method to use is to roll the dough out using two layers of floured-parchment paper and I found that it was too soft to lift off so I just cut the rolled-out dough into the square shapes and placed the bottom parchment paper onto the baking sheet.
- After the 25 mins baking time the wafers were still soft on top but became crisp and hard after cooling. They puffed up a lot I just used a clean towel to push the fresh-out-of-oven wafers flat.
- You need to only make a 1/4 batch of the wafer recipe to make enough crumbs to make the bar.
- The butter/icing sugar/custard powder layer (the middle layer) whips up to a very light and puffy mixture.
- Just use volume measurements for the crumbs and the cocoa etc the nature of the bar recipe allows for the use of volumes instead of the normal weight measurements.
- Australia (Sydney) is so HOT at the moment so the recipe took about seven hours there was a lot of chilling for each of the layers.
- The resulting bar needs a lot of chilling to be able to be sliced into nice shapes.
- Most likely the bar will be a little soft if making it in a very hot and humid country like Australia.
- This bar tasted like the best 'Cherry Ripe' recipe I have very had since there is so much butter and yummy ingredients in the bar wonderful with iced tea on a hot summer's day.
- I think I will try slicing the bar after it has chilled overnight the picture below is after about 1 hour of chilling.
 Recipe")
Filed Under these categories
- 154 Baking
- 2 Canadian
- 30 Chocolate
- 19 Cookies/Biscuits
- 287 Course
- 366 Cuisine
- 13 Daring Bakers
- 227 Desserts/Sweets
- 43 Events
- 447 Gluten Free
- 705 Kid Friendly
- 330 Super Bowl
- 248 Valentine's Day
Related Posts
Graham Honey Bread By DK on Sep 3, 2011

Peanut Butter Chocolate Chip Granola Bars By DK on Apr 11, 2020

Graham Saffron Waffles By DK on Mar 21, 2011

Moist Quinoa Chocolate Cake By DK on Dec 23, 2012

Roasted Pumpkin Pie with Chocolate Crust By DK on Nov 18, 2014

Double Chocolate Banana Cake By DK on Oct 21, 2016
Leave a Reply
3 Member Reviews
By Wendy on Jun 29, 2011
Made it twice, used the left-over cookies to make it again. Super yummy of course. I'm from Canada, so these are a well known treat.
By Marit on Mar 31, 2011
Hmm. I didn't have any vanilla pudding but I did have intense chocolate cravings so I dug out an old custard recipe, which made an excellent substitute for the middle layer. In fact, my family likes it better than the original! It's a little less sweet and a little runnier at room temperature, so I would suggest keeping the bars chilled right up until serving if you use custard. I also used hazelnuts in the bottom layer, which was good but I think would be better separate from almonds.
45 Comments
By dawn on Dec 6, 2012
By Melisa on Nov 28, 2012
By Isha on Oct 19, 2012
aaah that sure would be a problem!:( May be keep it in the fridge and working in intervals? Or may be try it when the weather is not so harsh? The problem is countries have their favorites dependent on the climate they enjoy. This is a Canadian favorite and its inevitable that we have issues in Indian weather. Guess the above mentioned would be the only two ways you would have to try...--DK
By elly on Jul 18, 2012
By Teeb on Dec 21, 2010
By Jay on Aug 5, 2010
I am sure it wont...It wont affect the taste much
By Jay on Aug 5, 2010
I am not sure about room temperature. I would personally refrigerate it. I did it covered in the fridge and stored for like a week since thats how long it lasted!! But I read somewhere that these last for upto 1 month covered in the fridge.
By saritha on Jul 12, 2010
Oh yes, you can easily use any digestive biscuits to substitute Graham crackers. Or crush your fav cookie recipe to make the crumbs. You can also use plain cookie such as vanilla wafers, shortbread, ginger snaps, Marie biscuits etc :)
By Isa on Feb 27, 2010
By Lillea Woodlyns on Feb 4, 2010
By sara on Jan 31, 2010
By Y on Jan 30, 2010
By Aparna on Jan 30, 2010
By Lisa on Jan 30, 2010
By Ex on Jan 29, 2010
By Barbara Bakes on Jan 28, 2010
By Siri on Jan 28, 2010
Pakka :)
By Tonic on Jan 28, 2010
By Radhika Vasanth on Jan 28, 2010
By Ramya Vijaykumar on Jan 28, 2010
By Lauren on Jan 28, 2010
All thanks to you Lauren :) --DK
By ap269 on Jan 28, 2010
By bharathi on Jan 28, 2010
If you buy Graham Crackers from the shop, then this becomes very easy :) --DK
By kate on Jan 27, 2010
By rachel on Jan 27, 2010
By sheba on Jan 27, 2010
By BHUVANESHWARI on Jan 27, 2010
Thanks so much Bhuvaneshwari :) :) As for the wafers, use any digestive biscuits or cookies instead - Marie biscuits probably would work equally well. Hope that helps :) --DK
By Nancy on Jan 27, 2010
By Sarah Galvin (All Our Fingers in the Pie) on Jan 27, 2010
LOL :) I am honored :) --DK
By Suz on Jan 27, 2010
By Malar on Jan 27, 2010
Oh well, this was made in the middle of my lazy bouts..so dont get cheated by that ;) --DK
By Liz on Jan 27, 2010
By Pavani on Jan 27, 2010
Oh yes! Store bought ones will def. work. This is gluten free that's why need to make it from scratch. You are right when you say these are too good not to make!:) --DK
By fairy_mi on Jan 27, 2010
By mridhu on Jan 27, 2010
By Indhu on Jan 27, 2010
If you buy the store bought graham crackers, then it becomes one of the easiest desserts to make..give it a try :) --DK
By Mary on Jan 27, 2010
By Feng on Jan 27, 2010
By Yaelian on Jan 27, 2010
By deepti on Jan 27, 2010
send me your address ;) --DK
By Asha on Jan 27, 2010
By aargee on Jan 27, 2010
By Priya on Jan 27, 2010
By Chafing Dish India on Jan 27, 2010
It has one egg - but can be easily substituted with flax seed. I dont think skipping it would hurt either :) --DK
By 35 Canadian Snacks Not Available In America | Narcity Toronto on Jul 8, 2016