French Macaroons (Macaron) with Chocolate filling by DK on Oct 27, 2009


 I know I READ all instructions again and again - guess theory alone didn't do any good! These came out tasting great - but the base was soft - with no feet
Macaron Flop Show- Batches 6, 7 and 8
I know I READ all instructions again and again - guess theory alone didn't do any good! These came out tasting great - but the base was soft - with no feet
Macaron Flop Show- Batches 6, 7 and 8
 Yet again different technique but same old sad story - Taste once again, great but looks wise and feet wise - this batch did not sprout feet either. Happy Feet they sure weren't! In fact there was NO FEET!!!
Macaron Batch 9
Just when I was giving up - tired, cranky, irritable, cursing woman is not good to be around with (ask my husband!) - one last batch of egg whites and last 2 cups of almond flour and 1/2 cup of powdered sugar beckoned me yet again! They seemed to tell me, "Just try one last time! - Dont give up on us!". So back to the computer - rewrote all techniques yet again, read through 50 more sites, glanced through 1000 tips yet again ( just let me get my hands on few of those ppl who wrote it #$%R%R$@!!!!!) and ground some powdered sugar at home for the recipe (late to shop)
Yet again different technique but same old sad story - Taste once again, great but looks wise and feet wise - this batch did not sprout feet either. Happy Feet they sure weren't! In fact there was NO FEET!!!
Macaron Batch 9
Just when I was giving up - tired, cranky, irritable, cursing woman is not good to be around with (ask my husband!) - one last batch of egg whites and last 2 cups of almond flour and 1/2 cup of powdered sugar beckoned me yet again! They seemed to tell me, "Just try one last time! - Dont give up on us!". So back to the computer - rewrote all techniques yet again, read through 50 more sites, glanced through 1000 tips yet again ( just let me get my hands on few of those ppl who wrote it #$%R%R$@!!!!!) and ground some powdered sugar at home for the recipe (late to shop)
 And tada - few BABY FEET AT LAST! Not great - but I had something to show at the end of it all and also some little justification for the immensely messy kitchen and for looking like a Halloween Ghost with all those powdered sugar on me!
So the main purpose of this post is to give you HANDS ON TIPS - so that you save those 8 batches of footless macarons! Try variations with tips that will not make you waste time with wrong base or technique. I have given tips at the end of every method where applicable to help out the beginners like me!
And tada - few BABY FEET AT LAST! Not great - but I had something to show at the end of it all and also some little justification for the immensely messy kitchen and for looking like a Halloween Ghost with all those powdered sugar on me!
So the main purpose of this post is to give you HANDS ON TIPS - so that you save those 8 batches of footless macarons! Try variations with tips that will not make you waste time with wrong base or technique. I have given tips at the end of every method where applicable to help out the beginners like me! - Cook time:
- Prep time:
- Yields: Makes around 10 dozens (although it made abt 5 for me)
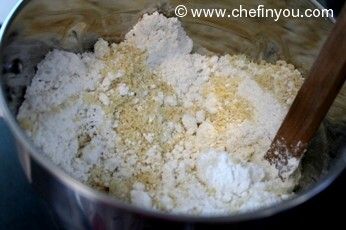
- Confectioners’ (Icing) sugar: 2 ¼ cups (225 g, 8 oz.)
- Almond flour: 2 cups (190 g, 6.7 oz.)
- Granulated sugar: 2 tablespoons (25 g , .88 oz.)
- Egg whites: 5 (Have at room temperature)
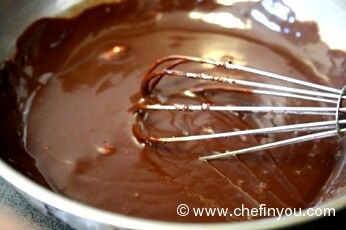
- For Chocolate Filling - Recipe from Davidlebovitz.com
- ½ cup (125 ml) heavy cream
- 2 teaspoons light corn syrup
- 4 ounces (120 gr) bittersweet or semisweet chocolate, finely chopped
- 1 tablespoon (15 gr) butter, cut into small pieces
Tips and Tricks
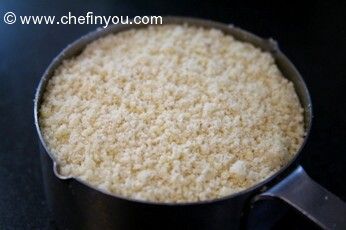
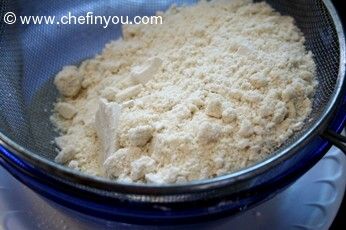
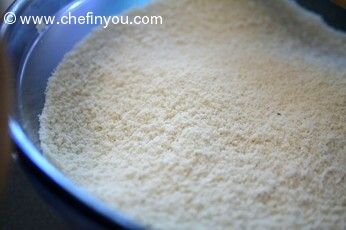
You can grind your own almonds to make the flour. But even if you buy the store bought ones - Grind them once again. Simply combine the powdered sugar and almond flour and grind them fine.

Tips and Tricks
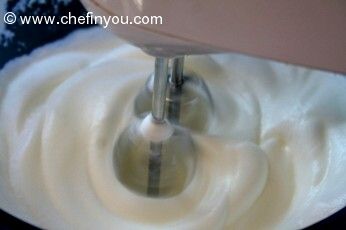
1.First make sure you separate the egg whites from the yolks very carefully. Even one single drop of the yolk can spoil the entire meringue.
2. Once separated, keep the egg whites on your counter top (covered with paper towel) for 1-3 days. This helps to concentrate the protein and bring out a shinier end result.
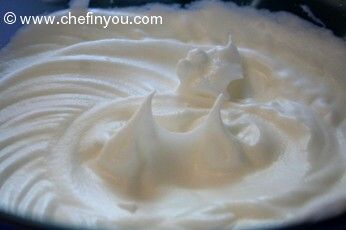
3. Soft Peak Stage - Start beating eggs at low speed for 1-2 minutes and then gradually increase it to med-high. You get a soft peak stage, I think approx in 5-6 minutes. You know you have a soft peak when you lift up the beaters and you see a peak but with the end slightly curled. They would droop slightly. You should be adding the granulated sugar now, little by little.
Tips and Tricks
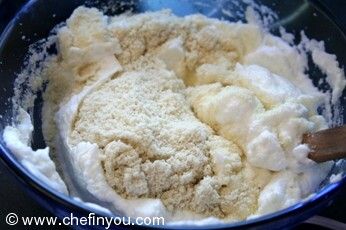
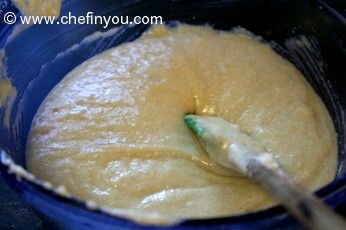
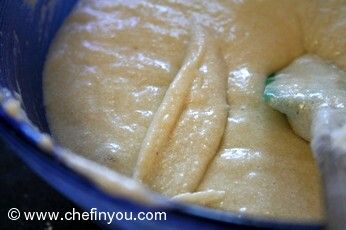
Folding is very crucial technique to make this macaron work. The correct and proper way of doing this would be as follows- To the meringue, add about 1/3 rd of the almond-sugar mixture. The first 6-7 strokes of mixing is going to be fast. You can do it little hard at this stage to help get rid of the air pockets formed while forming the meringue. The correct way of folding would be to cut the batter in the center, scrap out the bottom most batter and bring it above folding over the top layer - turn the bowl slightly and repeat the process. Doing so this way, will avoid air getting into the meringue while folding. Do this fast and hard for first few strokes and then slowly and gently finish off with the rest of the almond mixture.
This Process is called Macaronage and the full process for this recipe takes about 5-8 minutes depending upon your style of foldingor 30 or so strokes!
You know your macaronage is just right when the mixture starts looking smooth and glossy.

Tips and Tricks
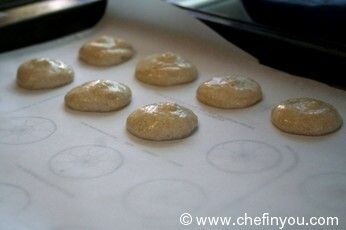
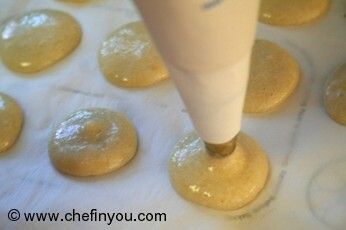
-If you have not mastered the Macaron yet, then I would suggest that you don't waste time by drawing out circles on the parchment paper (helps to drop correct amount of batter on the sheet). Instead you can download this pattern from here : http://en.mooseabout.com/wp-content/themes/mooseabout/documents/zwcok-maccir1-3p8.pdf and take a print out. You can concentrate more on the technique instead of drawing circles on the paper. Saves time and effort too :) Works for lazy bums like me too. If that template does not work use this - http://marvwoodhouse.com/wp-content/uploads/2010/07/zwcok-maccir1-3p8.pdf (thanks Amy)-Just place the print out sheet just below your parchment paper

Bake the macaroon for 5 minutes. Remove the pan from the oven and raise the temperature to 375°F (190°C). Once the oven is up to temperature, put the pans back in the oven and bake for an additional 7 to 8 minutes, or lightly colored. Cool on a rack before filling.
Tips and Tricks
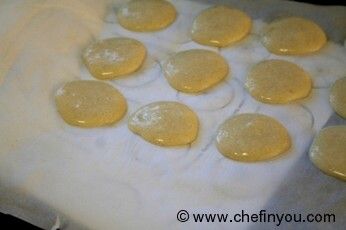
Another possible issue usually faced by many is while removing the macarons from the parchment paper. I did not have a single problem and I did this -
Dampen a kitchen towel and place it flat on the counter. Now take the parchment paper and place it on top. Give it, say 10-15 seconds, and then slowly using a knife edge, lift up the macaron. You might need to do a little slicing action - but trust me, it did not break even a single macaron and 90% of the case, the macarons came out willingly! So much so, that my parchment was reusable! It was that clean!


Filed Under these categories
- 154 Baking
- 30 Chocolate
- 19 Cookies/Biscuits
- 366 Cuisine
- 13 Daring Bakers
- 227 Desserts/Sweets
- 43 Events
- 12 French
- 18 Pies and strudels
- 248 Valentine's Day
Related Posts

Badam Kheer (Sweet Almond pudding) By DK on May 18, 2010

DBer’s Lemon Meringue Pie By DK on Jan 28, 2008

North Indian Styled Egg Curry (OPOS) By DK on Nov 11, 2016

Angel Cake with Cherry Berry Coulis By DK on Aug 16, 2012

Egg, Onion and Yogurt Curry By DK on Apr 19, 2014

Egg Dosa with Quinoa By DK on Mar 18, 2014
Leave a Reply
2 Member Reviews

By L on May 16, 2013
Here's the photo relating to my previous comment (as "L123").
These are the macaroons that I made using your recipe. I was very happy with the way the shells and the feet turned out, I just need to work on the shape (round rather than oval) and I'm going to use skinless almond flour next time.
I made a rosewater buttercream for the filling.
The macaroons seem to be at their best after being stored in a container for 2-3 days in the fridge. The flavours have combined well and the texture is just right - crisp shell, soft and slightly chewy on the inside.
Thanks a lot for the recipe!!! 


By Hanim on Oct 18, 2010
Hi, after my first failed batch, i almost giving up until i stumble upon this website. The tips and tricks make it very simple to follow, except that I've changed the filling to strawberries sweets.
40 Comments
By Zakir on Jul 18, 2012
By Dan on Mar 5, 2012
By Sabrina on Dec 29, 2011
By Varsha on Nov 27, 2011
By Kath O'Keefe on Sep 18, 2011
By Nicola on Sep 7, 2011
By recipe macaroon on May 20, 2011
By str4y on May 7, 2011
By debbie owen on Mar 16, 2011
By zeek on Feb 28, 2011
By Diana on Feb 10, 2011
By Amy on Jul 30, 2010
By Amy on Jul 30, 2010
By Marcarons, not Macaroons! - Food and Drink -cooking, cuisine, meat, vegetables, restaurants, diet, prices, allergies... - Page 7 - City-Data Forum on Jun 29, 2010
By Kim on Jun 28, 2010
By Nardia on Jun 21, 2010
By Sharon on Jun 17, 2010
By Kathy (Mother of the bride) on Jun 16, 2010
Oh sorry about that - it doesnt open for me either..Lemme see if I have it somewhere...will mail it to you if I find it! --DK
By Kathy (Mother of the bride) on Jun 16, 2010
The ruffled look at the bottom of the cookie is called the feet. It forms while baking and thats the famous thing in this cookie! It troubles the heck out of you to form into luscious looking ones! but when they do - they look bliss :) --DK
By Dimity on Jun 8, 2010
By Sarah on Mar 11, 2010
By Maya on Mar 10, 2010
By Kate on Feb 21, 2010
You just voiced every single thought of mine when I was doing this myself!!! LOL! The notes I provided at the end of each of the steps were what finally got me my feet, however miniscule they were. I think they would have been better if I was not so cranky, irritated and completely exhausted at the end of so many attempts. I am sure if I make a fresh start with these notes I will surely come up with feet! (fingers crossed). Other than those I cannot think of anything more - I have to make this again sometime soon - but I guess I am still not out of the nightmare of the previous one! May be soon :) :) Wishing you wonderful full feet (!!!!) the coming weekend!!!! Wud luv to see it --DK :)
By Leslee on Jan 21, 2010
I really am not sure. The fact that even with the sugar, the art of getting these right is so hard for me that I haven't experimented with anything else yet. Lemme try it out and get back to you :)--DK
By Tee on Jan 18, 2010
aaah! I can totally understand what you are going through having been in the exp just few months back. I am yet to retry these again (I sure will until I perfect it!!!) - The tips which actually worked for me, the steps I did differently for my last try are the ones I have provided in Italics in the steps. Very minute differences but they do make all the difference. Your comment reminds me I have to make these again!!! Hope the tips help you and making a successful 7th time--DK
By Pet Parent on Dec 22, 2009
aaah! It takes one to know the other! This cookie sure tested my patience and like you said, I have it in my to-do list yet again after I start forgetting the crankiness of the fateful day I tried them out. Cant give up on these cookies yet ;) Well I actually got the almond flour in the store. Didnt try grinding it at home yet. And the store ones I ground along with powdered sugar in my normal food processor. I think the trick is to grind them on high with regular intervals so that the heat from the processor does not get to the flour. I think thats what is making it pasty.Run the processor for say 5-6 seconds, let it sit for few more seconds and stir the powder checking to see they are not sticking anywhere and then again process it for few more seconds. Do this 3-4 times - try sifting now. They will light and fluffy and not pasty at all. I hope this helps and wish that you get the most scrummiest tasting and looking macaroons :)--DK
By veenaw on Nov 3, 2009
By Sudha on Oct 28, 2009
By rachel on Oct 28, 2009
By Audax Artifex on Oct 28, 2009
By easy recipes on Oct 28, 2009
By Kim - Easy French food on Oct 28, 2009
By Pari on Oct 27, 2009
By Sonu on Oct 27, 2009
By Vinolia on Oct 27, 2009
Oh yes - I did it indeed for 45 minutes or so every time I made a batch. I think I forgot to update that in the tips section! Thanks for the encouragement though! :) -- DK
By L123 on May 14, 2013
Oh thank you so much for the tips. Awesome. I def. provide a way you can give your feedback along with a picture for every recipe in this site. Would love to see your picture here: http://chefinyou.com/i-made-this/?recipeid=2416 --DK