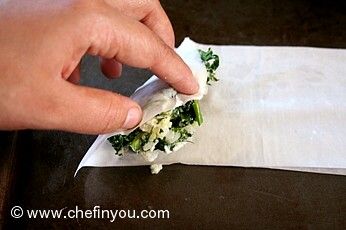
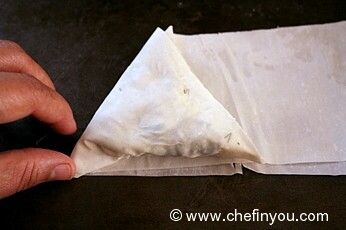
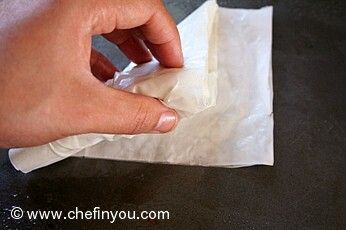
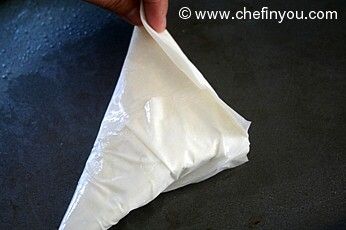
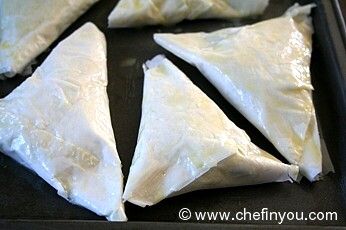
Greek Spanakopita Triangles Recipe
There is something to be said for combining Spinach with feta and ricotta cheese. The sensation that it creates is amazing. The Greek do know how to eat! The creaminess of ricotta and the saltiness of feta combine with earthy spinach to create a wholesome taste. Spanakopita is a Greek savory pastry belonging to the Burek family (may be that's where borekas come from?) enjoyed either by way of Pie or cut into triangles.

Greek Spanakopita Triangles Recipe
According to Wikipedia "Spanakopita is similar to torta pasqualina, a traditional dish from Liguria, that is very common in Argentina and Uruguay." The world gets closer and closer in so many ways than just internet. Since I was planning it for a potluck, I thought of shaping them as triangles which makes for a great appetizer. Personally, a pie is more of a main course than a quick bite. But if you want to make the pie version see this video (thanks to you tube) below.
  • Cook time:
  • Prep time:
  • Serves: 4 people
  • Yields: Makes around 8 triangles
Ingredients
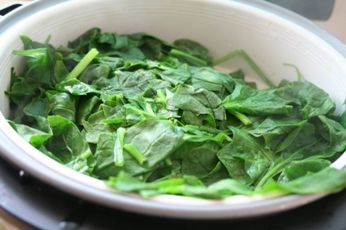
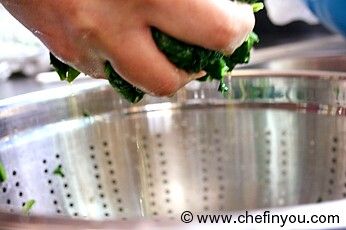
  • About 3 bunches of fresh spinach (about 2 lbs, I think)
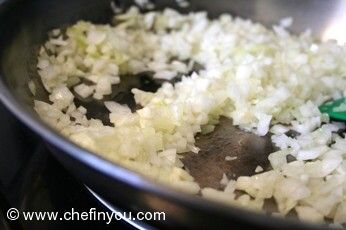
  • 1 onion, chopped finely
  • 6-8 spring onions (scallions),chopped
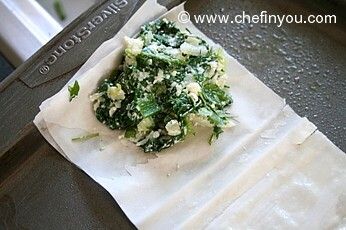
  • 5 oz (150g) feta cheese, crumbled
  • 3 oz (90g) ricotta cheese
  • 1/3 cup (35g or 1-1/4 oz) freshly grated vegetarian parmesan
  • 1 tbsp fresh dill,chopped
  • 1 generous pinch of nutmeg
  • about 1/2 cup fresh parsley,chopped (cilantro works well too)
  • 12 sheets of filo pastry, thawed (Make your own from here)
  • about 3-4 tbsp of unsalted butter, melted + some olive oil (or more if required)
Method
1. Trim the stems of spinach and clean them well in cold water. I find that filling the kitchen sink with lots of water and then submerging and rinsing the spinach works well in cleaning out the mud and debris. Drain. Roughly chop and them place it in a steamer.
2. Steam for 5-8 minutes or until the leaves are wilted.
3. Drain. Squeeze out the excess water from the spinach. This step is extremely important to avoid a soggy filling. set aside.
4. Take a skillet and heat 1 tsp of Olive oil and saute the onion until tender.
5. Add the spring onions and cook for another 2-3 minutes.
6. Remove from heat and then add the spinach, herbs, cheeses and nutmeg. Season with salt and pepper if required. You can taste it to see if it does not have enough salt from the feta cheese.
7. Preheat the Oven to 350F (or 180C). Place the 3 sheets of filo at a time (keeping others covered to avoid drying out). Mix the butter and 2 tbsp Olive oil in a small bowl. Brush each sheet with butter mixture and lay on top of another.
8. Cut into equal thirds lengthwise.
9. Spoon a little filling on an angle at the end of the each strip. You don't want to be overzealous here with the portion since it will slip out later.
10. Fold the pastry over to enclose the filling
11. to form a triangle.
12. Now take it upwards to form another triangle
13. Repeat this process until you reach the end.
14. You will have a small strip at the end
15. which you can grease with little butter mixture and stick to the pastry.
16. Brush the top lightly with butter mixture.
Grease two baking sheets.Bake the triangles for 20-25 minutes or until the pastry is golden brown. Greek Spanakopita Triangles Recipe Don't count on leftovers! I assure you, you would be hard pressed to have any left! Greek Spanakopita Triangles Recipe

Recipe Reference

my kitchen notes

Related Posts

Leave a Reply

I love to hear from you! I read each and every comment, and will get back as soon as I am able to.
Did you try this recipe? Please share your feedback!
Upload Your Recipe Photos

5 Member Reviews

By Fran on Aug 17, 2012

I copied the recipe with smaller amounts. Found the FILO pastry very easy to work with & if you make a small mistake it doesn't really matter. Yum!

By Hilda on Sep 27, 2011

tried the receipe and it was great...I however, sorta of cheated by using the spray olive oil on each of the stripes rather than brushing...only brushed the finished triangle with butter...it was easier and it prevented the filo from drying, especially since I have a problem with my hands and it takes me longer to create the triangle

Read All 5 Reviews →

55 Comments

By Greek pie recipe – Spanakopita with spinach and feta cheese - Diana Anghel's blog on Jan 10, 2015

[…] How to Make Spanakopita traingles Recipe | Greek Spinach Pie | Easy Appetizer Recipes | Chef In You […]

By Greek pie recipe – Spanakopita with spinach and feta cheese - Danghel Blog on Jan 9, 2015

[…] How to Make Spanakopita traingles Recipe | Greek Spinach Pie | Easy Appetizer Recipes | Chef In You […]

By Sindages Magirikis on Oct 17, 2014

Totally loved this recipe! Made it for launch for my kids at school and they loved it! Thank you!

By Jacki on Sep 9, 2014

Recipe looks wonderful! Wondering though if I use fresh spinach - 2 lbs sounds like a lot. I am used to using the frozen chopped spinach and a little leary that I won't get the amount right if I use fresh (though I would prefer fresh if I can get it dry enough). Another question - if you are making these ahead of time - is it best to freeze them uncooked or cooked? And how much re-heat time for each at what temp (I don't want to burn them!) thanks again, Jacki

By Flynny on May 5, 2014

I have made these 3 times now, and have turned out wonderfully every time. A bit of work to make but the end result is worth it every time!!

By Vana on Mar 2, 2014

In Florida I bought frozen Daily Chef brand Spanakopita all the time at Sam's Club. I have moved to Oklahoma and the Sam's here swears it is only seasonal. I am going to try this recipe soon as I am using the last of my frozen ones right now and must have them again before Thanksgiving. I could have them for dinner several times a week!

By Let the Cooking Begin! | stephaniegiese7 on Dec 17, 2013

[...] my second attempt I decided to use a spanakopita recipe I found online on the blog called Chef in You. It is similar to my mother’s but has a few [...]

By Carol on Nov 22, 2013

Great recipe . I make these every year and freeze the unbanked triangles. Nice to pop out of the freezer for guests.

By Allan on Nov 21, 2013

You can buy these at M&Ms

By Jessica on Jul 1, 2013

Delicious! It took a bit of time, but was well worth it! I added a bit of lemon-pepper and zatar seasoning to the mix....gave it a nice little zip. THANKS for posting this recipe!

By Elaine on Jun 27, 2013

I didn't like the fillo I bought but they came out pretty good. Thanks

By Carolyn on Jun 1, 2013

Just wondering us these can be made ahead of time. Or at least the filling?

By Ai on May 2, 2013

You can buy frozen spanakopita from Trader Joes instead, Kashmir.

By Theodora on Feb 12, 2013

Great recipe especially for my "pethera" mother in law who can't eat eggs and this doesn't have eggs. Thanks!

By kashmir singh on Feb 6, 2013

pleasetellmewhere icanbuytriangespankotpia

By Nicole on Jan 19, 2013

Amazing recipe! Made it twice and was a great hit everyone loved it :-P

By Mama'sGirl on Jan 15, 2013

This was a fabulous recipe! I'd never worked with phyllo before, and even though its finnicky, your method of forming the triangles was very forgiving. I must have used less filling in each one because it made several so I refrigerated half of them unbaked and they were even better the next day! Thank you so much for sharing; I am already starting on the next batch. :-D

By Anne on Jan 1, 2013

Will make these with friends at a cooking party in two weeks. Want to encourage all filo virgins to give it a try. I did for the first time last year and, because the appet. I made didn't use the whole batch, decided to try other stuff--made a chicken/mushroom strudel, apple strudel, blueberry strudel...even tackled Morroccan bastilla. All great and people are wowed by it. They have no idea how easy it is.

By newgirl on Dec 30, 2012

When making the homemade phyllo can you use red wine vinegar instead if that's what you have on hand? and whole wheat flour?

By graying at the temples on Dec 29, 2012

Dah, didn't you forget one itsy-bitsy detail like the temp at which you bake the triangles for the 25-30 minutoes, chef :?:

Nah, I didn't. Pls refer step 7. Oh by the way, call me DK. --DK

By Brandy on Nov 12, 2012

Im making these as an appetizer this thankgiving after having something like this at a wedding. Many other recipes call for frozen spinach thawed and drained. That would be easier and less expensive. Can you substitute the fresh for frozen in this recipe? cant wait to try it.. :lol:

I don't see why not :) --DK

By Preserving the harvest – spinach « Sustainable Communities SA on Oct 18, 2012

[...] the fridge until ready to use. Here is a good recipe which can be made using frozen spinach – Spanakopita triangles – Chef in You . This recipe includes dill, spring onions and parsley – all these can easily be grown at home [...]

By Baking and Love – One and the Same? « on Sep 4, 2012

[...] (taught by Chef Vitoulis).  A delicious treat that is really quite simple to make.  Here is a recipe I found that is very similar to the way I learned to prepare it.  It’s definitely worth [...]

By pattirose on Jul 23, 2012

i never thought of omitting the eggs but i gave it a shot and I really didn't notice any difference, they are n the oven now, thank you!

By Big Fat Greek Food: Greek Cuisine | drinkforthought on Jun 2, 2012

[...] For a great Spanakopita recipe that’s extremely helpful with pictures and videos, click here. [...]

By CatInked on May 31, 2012

I love how you take pictures for every steps.

By petrockloverzzz13579 on May 27, 2012

:cry: Why can't I? Everyone else succeeded but not me. #Unlucky# :cry:

By Cool Finds Saturday on May 26, 2012

[...] spanikopitas from Chef In You remind me a lot of the bureks that my husband used to get from the local market back in Ontario. In [...]

By NewbieCook on Apr 8, 2012

Wow, this sounds delicious! I am not very much of a cook, and it's doesn't help that this also looks a little out-of-my-league, but I would definitely want to try it.

By Pastries of Greece: Spinach Phyllo Pies, or “Spanakopita” « Whoopsyummy on Mar 23, 2012

[...] to continue wrapping a triangle shape; over and over again.If you want more of a tutorial, go here, to bottom of [...]

By Valencia on Dec 17, 2011

Perfection! Thank you for the step-by-step process. They were delicious.

By Michelle Yanchula on Dec 6, 2011

oh yeah, if freezing, use parchment paper to separate triangles so they don't freeze together.

By Michelle Yanchula on Dec 6, 2011

oh geez---thanks for the tip! i was cutting my phyllo into thirds but also cutting in half lengthwise. your method for forming triangles looks much easier and quicker! thanks. highly recommend making these and in my experience, they freeze very well. i'll take an afternoon and make a ton of them. they make a quick meal coupled with a salad or just a snack--frozen 20-30 minutes at 350 degrees. brush pan with olive oil. also, i use olive oil and no butter for sauting and basting. delicious!!!

By Zesty spinach and feta pies | Drizzle and Dip on Dec 1, 2011

[...] is very easy, but if you have difficulties you can see a detailed diagram of how it is done here (scroll down to the bottom of the [...]

By Kalyani on Nov 9, 2011

hi DK ! I dont seem to get either phyllo or puff pastry sheets where I live.. Do you think this works with plain APF sheets rolled out ??

making ur own filo/phyllo sheets is easy. I have a post for that. see here : http://chefinyou.com/2010/03/filo-phyllo-dough-recipe/

By sudha on Aug 3, 2011

had always had store (costco) bought Spanakopita in the freezer..... tempted to try making some this time - thnks :-P

By judy on May 1, 2011

Hi I follow your blog a long time..you are doing a wonderful work. Your recipes are awesome and the step by step pic is helpful.Thanks a lot for sharing for recipes.I made the spanakopita,paneer cigars and low calorie aloo bonda..all turned out so good.

By A Cup of Sugar … A Pinch of Salt » Spanikopita Triangles on Mar 3, 2011

[...] Here is a good example of the procedure. I don’t have the patience to photograph, and besides, would need an additional set of hands. [...]

By WYF: Tea time snack event roundup- Part 1 | WYF: Tea time snack event roundup- Part 1 healty| WYF: Tea time snack event roundup- Part 1 > | healty foods | healty diet | healthy food on Dec 21, 2010

[...] DK from Chef In You: Spanakopita [...]

By Serene on Dec 21, 2010

:-P I loved this receipe. It was easy to follow especially with the step by step on the triangles. Thank you!!

By aj on Nov 22, 2010

OMG I TOTALLY MADE THEESE ONCE THEY WERE LIKE YUMMY YUMMY YUMMY FOR MY TUUUUMY YUPP BUT A LITTLE HEAVY ON THE MUSTARD HAHA JUST KIDDING THERE IS NO MUSTARD KAY WELL I HAVE TO GO BYE YALL!

By Gem on Oct 19, 2010

Wow! I found this recipe earlier today and just made it.... It's amazing!!!! Tastes so yummy but may need a bit of practise before mine looks as gorgeous as yours! Thanks for the recipe :)

By SuperChef on Dec 9, 2009

loove spanakopitas!! thanks for the entry :)

By EC on Dec 4, 2009

Wow,this is amazing..thanks for participating

By orlando custom home builder on Dec 1, 2009

Oh my goodness this made me so hungry! I'm just a fan of spinach in every form!

By vanamala on Dec 1, 2009

wow awesome...longtime i came here..lovely recipes yaar

By Anu on Dec 1, 2009

These look professional and absolutely awesome! Love them always and yours look perfect. Wish I can eat them now.

By Pavithra Kodical on Dec 1, 2009

Spanakopita looks delicious.. I often avoid myself using filo sheet as it is difficult to manage..But your pics are so tempting, i will try this.. I make the same using pastry sheet, but will try with filo sheet next time :)

By Mala on Dec 1, 2009

Oh... U make everything sound so easy Dhivya !!! :-D I am SOOOO going to try these..... Thanks for a great recipe ! :)

By Vinolia on Dec 1, 2009

they look fantastic and perfect; I love the spinach/feta/ricotta combination, must have been sensational!!!!the filling sounds delicious; clearly demonstrated too!!

By Priya on Dec 1, 2009

Such a tempting and really inviting spanakopita..yet to try out at home..

By Happy Cook on Dec 1, 2009

Wow that is so so crunchy and beautiful and so fully filled up.

By Nithya on Nov 30, 2009

Wow.. This one is really inviting. yummmmm :wink:

By Pavani on Nov 30, 2009

They look delicious. Never tried making these at home, handling phyllo is a little scary to me. Heard it tends to dry out very quick. Should give it a try anyway.. Your baklava recipe has been on my to-make list for the longest.

Yes it does - but its not as complicated as it sounds. Just place some damp towel on top for the remaining ones...and u can carry on with the current one! When u do it, you will realize things sometimes sound too bombastic and hi-fi than they really are ;) --DK

By musical on Nov 30, 2009

Been ages since I made these! May be i should make some soon :).