Ethiopian Injera by DK on Feb 1, 2010


- Cook time:
- Prep time:
- Serves: 2 people
- Yields: Makes 2 cups Starter and the batter (uses only 1/4 cup of starter) makes about 4-6 injera. Using all the starter will make around 30 Injera
- For the starter - Takes five days. If you want to have some starter left over to make injera again, wait seven days.
- 3/4 cup water, room temp. (70 degrees)
- 1/2 cup teff flour
- A pinch active yeast (about 1/8 tsp)
- For the Injera
- 1/4 cup teff starter
- 1-3/4 cups water, at room temperature
- 1-3/4 cups teff flour
- 1/4 tsp salt
Lets start with the starter first! (Duh!) I followed Bread chick's instruction to the tee
Day 1:
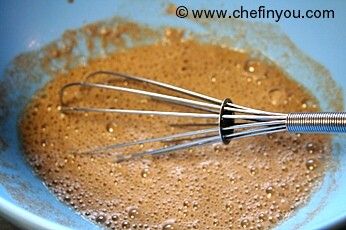
Combine ingredients for the starter in a bowl.
Day 3:
Stir the starter. This is when the stinker effect starts. The starter has a very yeasty and grassy smell. You will also notice that small bubbles on the surface now.

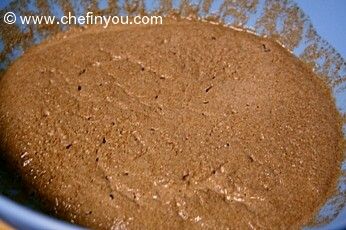
Feed the starter 1/3 cup teff flour and 1/2 cup water and loosely cover with the lid. Let alone for 2 days.
Day 5:
Starter should have separated into distinct layers. You would think that something has gone wrong with it - what with watery layer on top and dense muddy flour at the bottom! But that's exactly what we are looking for :) Stir starter, it should be slightly fizzy and have a very strong grassy aroma. Feed with 1/3 cup teff flour and 1/2 cup water. Loosely cover and allow to sit alone for at least 4 hours before using to make Injera. You should have about 2 cups of starter by now.
Note:
If you go to Day 7, follow Day 3 instructions for Day 5. You will have left over starter to make Injera again in the future this way.
( I just realized that I have forgotten to take a picture of my day 5 starter! Guess that stink got to me! )
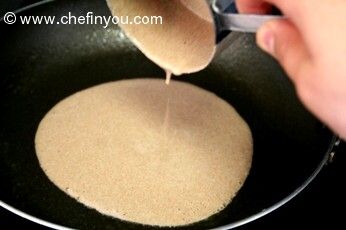
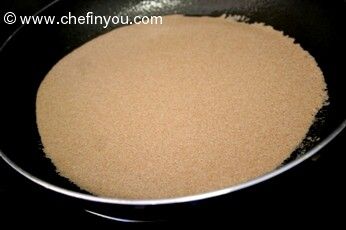
Now lets go to the Injera recipe (verbatim from this link) Uses only 1/4 cup of the starter. If you want to use all the 2 cups of the starter increase the flour, salt and water accordingly
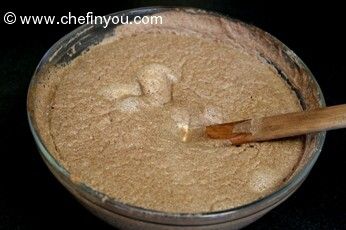
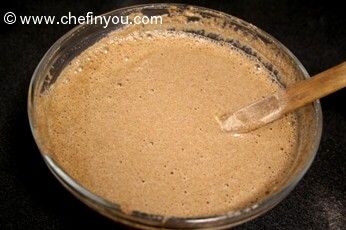
Mix. Place the starter in a bowl. Pour the water over the starter and stir to dissolve.


Filed Under these categories
- 287 Course
- 366 Cuisine
- 1 Ethiopian
- 45 Flatbread
- 447 Gluten Free
- 206 Healthy Foods
- 336 Main Course
- 499 Vegan Recipes
- 113 Wholegrain
Recipe Reference
recipe courtesy for the starter from bread chick and the making of the bread from apple pie, patis and pate
Related Posts

Sada Dosa (Plain South Indian Crepe) By DK on Mar 19, 2010
Wholegrain Quinoa Bread By DK on Apr 19, 2010
Multigrain (5 grain) Spelt Bread By DK on Jan 19, 2010
American (White) Sandwich Bread By DK on Aug 27, 2012
Graham Honey Bread By DK on Sep 3, 2011

Classic Banana Bread By DK on Feb 7, 2015
Leave a Reply
7 Member Reviews
By Michael on May 30, 2013
I haven\'t started this recipe yet, but am going to soon, am still trying to source my Teff. I just wanted to agree with an earlier poster, if anybody is having issues grinding there own flour purchase a vita mixer, they are an amazing blender, they come with a purpose built tub for grinding dry goods and making flour, I used to have a small flour mill and sold it after I got this unit. nothing makes flour faster. they are also very heavy duty units. anyways, I think I\'ve found my source for Teff and intend to start it this wknd, I am also looking for recipe\'s on beer made with Teff, apparently it makes a good beverage, my sister has celiac and misses beer. :)By chourcha on Sep 2, 2012
Followed your recipe except for the starter I used sourdough starter from Amazon. The injera looked great except for the ones I tried to use Absit. ( in Ethiopia a small portion of the mix is added to boiling water and cooked to a gravy consistency; after cooling down the Absit it's added to the mix. Wait until it rises again and make the injera)
the injera with Absit didn't look great but they were softer.
203 Comments
By nikki on May 16, 2018
By Barbara on May 5, 2018
By Debi on Mar 14, 2018
But I have pretty much done what the original link says.So you can refer to my post if thats broken. --DK
By Nanz on Jan 15, 2018
By Eden on Jan 13, 2018
Thank you so much for the knowledge. Nothing like hearing it right from the source. Appreciate it :) --DK
By Lucy on Feb 23, 2017
By beth on Feb 7, 2017
By Howard on Dec 10, 2016
By Varda on Sep 4, 2016
By cr on May 17, 2016
By Joanna on May 10, 2016
By Angela on Mar 6, 2016
Two options. 1 Try just spreading it around with your ladle itself. 2. Take a separate bowl with just the batter needed to make one, add wee bit water to thin it lightly and try the Injera. Test the end result of both and opt of the one you prefer. Since I haven't tried it out myself, I can only suggest a workaround. Hope this helps :) --DK
By Fassica on Mar 1, 2016
By Julia on Oct 18, 2015
By Guy on Jul 15, 2015
one AND 3/4 cups --DK
By Renee on Jun 8, 2015
By Regina on May 12, 2015
By Giusi on May 2, 2015
By Jamie on Mar 30, 2015
By Guide to Whole Grains Pt. 4 - Recipe Roundup - Fast to Fresh on Mar 19, 2015
By bethan on Mar 17, 2015
By Dawn on Feb 28, 2015
By susan on Feb 3, 2015
By Meatless Monday Roundup: 4 Pancake Recipes on Feb 2, 2015
By gg on Dec 11, 2014
By gg on Dec 11, 2014
By Friend on Dec 1, 2014
By gg on Dec 1, 2014
By Fosolia (fasolia) – Ethiopian Green Beans and Carrots | Wheat-Free Dairy-Free Kitchen on Oct 27, 2014
By Martin on Oct 14, 2014
By Thabile on Sep 21, 2014
By Tina on Sep 15, 2014
By Edith on Sep 14, 2014
By Donna Elhard on Sep 4, 2014
By Why You Should Grind Grains Other Than Wheat . . . / BePrepared on Jun 25, 2014
By BernadetteDemone on Jun 20, 2014
By Andrew on Apr 15, 2014
By Jaqueline Yamey on Apr 8, 2014
By Robin on Apr 7, 2014
By Jaqueline Yamey on Mar 19, 2014
By rosalie on Mar 18, 2014
By Golubka Kitchen on Mar 16, 2014
By Luisa on Mar 6, 2014
By Jaqueline Yamey on Mar 1, 2014
By Theta on Feb 23, 2014
By Selam on Feb 22, 2014
Its amazing that you compare my attempt with the very best out there. I take it as a compliment :) --DK
By Recipes for Life | Rediscovering Fermented Foods on Feb 17, 2014
By Shaari :) on Feb 17, 2014
By Wylie on Feb 10, 2014
By Wylie on Feb 10, 2014
By Bishir on Jan 30, 2014
By Hungry for health film on Jan 25, 2014
By sheila on Jan 17, 2014
By John on Jan 8, 2014
By Lizzy on Jan 4, 2014
By Cheryl NY on Dec 13, 2013
By Duane J Marcroft on Nov 16, 2013
By 9 Ingredients That Make Any Dish Healthier « Grind Report on Oct 29, 2013
By Buster on Oct 26, 2013
By Sandra on Oct 17, 2013
By daizyjune on Oct 15, 2013
By Buster on Oct 15, 2013
By Susan on Sep 25, 2013
By Mike O'Hara on Sep 23, 2013
By Marika on Sep 7, 2013
By Texas Firefly on Sep 3, 2013
By Ellen on Sep 2, 2013
By 9 Ingredients That Make Any Dish Healthier | Eat.Live.Ride on Aug 26, 2013
By Ingredients That Make Any Dish Healthier | Cambridge Hub on Aug 26, 2013
By 9 Ingredients That Make Any Dish Healthier - Freshwadda Brooks | Coming Soon! on Aug 23, 2013
By Gautami on Aug 21, 2013
By daizyjune on Aug 20, 2013
By Natalie on Aug 20, 2013
By Gautami on Aug 19, 2013
By Lidya on Aug 18, 2013
By Gautami on Aug 16, 2013
By sanne on Jul 2, 2013
By Joseph on Jun 29, 2013
By Elizabeth on Jun 19, 2013
By Amy on Jun 7, 2013
Actually it sounds about right- see my Day 5 (step 4). It looked dead to me - may be thats why I forgot to even take a picture. Stick with it - it probably is still alive and stinking!!! ;)--DK
By Shakakhan on May 25, 2013
By Mark P on May 10, 2013
By Eat This! Teff | No Baloney on May 1, 2013
By Theta Ciriello on Apr 22, 2013
By billie on Apr 15, 2013
By Misir Wat or Ethiopian red Lentils | veggiezest on Apr 9, 2013
By gr8shoes on Apr 7, 2013
By Lidya on Apr 1, 2013
By John Langevin on Mar 31, 2013
By brenda on Mar 7, 2013
By Victoria on Mar 7, 2013
By Noreen on Feb 26, 2013
By daizyjune on Feb 21, 2013
By daizyjune on Feb 21, 2013
By Darcy on Feb 21, 2013
By Weezie on Feb 5, 2013
I have made only about 4 Injera here, hence used only 1/4 cup of the starter. Only if you were going to make the entire batch then you would need to reserve the starter. I just included it in the recipe if you were going to be using it all up right away. Will add a more clear note in there. --DK
By Constance Gravestock on Feb 4, 2013
By Jeste on Jan 25, 2013
By Phillip on Jan 16, 2013
By Beverly Weeks on Jan 15, 2013
By Lidya on Jan 4, 2013
By bett on Jan 3, 2013
By Juney on Jan 1, 2013
By David Waterbury on Dec 27, 2012
By Bob on Nov 30, 2012
By Bekelu on Nov 20, 2012
By Robin H on Nov 20, 2012
By Ten Grains You Can Enjoy on a Gluten-Free Diet | ACN Latitudes on Nov 15, 2012
By Eva on Nov 14, 2012
By Gluten-Free Black Bean Flour Tortillas | Gourmandelle on Nov 9, 2012
By DaizyJune on Nov 5, 2012
By Shannan on Nov 5, 2012
By T on Nov 3, 2012
By T on Nov 3, 2012
By Rajendra kumar on Nov 3, 2012
By Alem on Oct 24, 2012
By maria ligia conti on Oct 23, 2012
Amazon. com carries whole grain Teff. Pls check if that option is available to you or any other online shops --DK
By bitaglitz on Oct 14, 2012
By Lidya on Oct 11, 2012
By Scott on Oct 9, 2012
By churcha on Sep 2, 2012
By JJ on Aug 26, 2012
By Africa, Land of Differences | Change is Good……Right??? on Aug 21, 2012
By Sarah on Jul 31, 2012
By RonB on Jul 2, 2012
Please refer the "Basic Information" section before the recipe, esp. the Yield section. --DK
By Tom Y. on Jul 1, 2012
By Organic Goddess on Jun 25, 2012
By Rosalind on Jun 24, 2012
By Rahel on Jun 23, 2012
By barry on Jun 8, 2012
By Please Pass The Injera | Live. on Jun 6, 2012
By Nunu on Jun 4, 2012
By Deborah on Jun 4, 2012
By A on Jun 4, 2012
By Aliyanna on May 29, 2012
By Ashleigh on May 29, 2012
By DaizyJune on May 26, 2012
By Kristina on May 11, 2012
By Radha on Apr 30, 2012
By Aliyanna on Apr 30, 2012
By Radha on Apr 29, 2012
By Aliyanna on Apr 22, 2012
By Radha on Apr 3, 2012
By Radha on Apr 3, 2012
By Sam on Mar 17, 2012
By Nunu on Mar 7, 2012
By Injera Adventures « The Spunky Veggie on Jan 23, 2012
By bakingbarb on Jan 9, 2012
By Nancy Culbert on Jan 5, 2012
By Marilyn on Nov 27, 2011
By Ed Handline on Nov 4, 2011
By valerie on Nov 3, 2011
By Ethiopian Injera Disaster | Multiculturiosity on Oct 13, 2011
By Getting a Taste of Ethiopia « A Life Vegetarian on Sep 26, 2011
By Minal Shah on Jul 18, 2011
By Tovah @ Glutenfreebay.com on Jun 23, 2011
By Tovah @ Glutenfreebay.com on Jun 23, 2011
By Angel of the North on May 1, 2011
By Gluten Free Flour Tortillas | Cybele Pascal Allergen-Free Cuisine on Apr 26, 2011
By Joe Wallen on Apr 15, 2011
By cheftimmi on Mar 30, 2011
By Chocolate Lady on Mar 28, 2011
By Kristen on Mar 27, 2011
By Tova on Mar 23, 2011
By bergina on Mar 12, 2011
By bergina on Mar 8, 2011
I didnt exaggerate when I say it makes a stinker ;). Stick to your guns and carry on! It will be worth it in the end...:)
By I ate it. It was me. « Gluphed! on Mar 8, 2011
By How to cook perfect pancakes | The Guardian Reader on Mar 8, 2011
By How to cook perfect pancakes | Hackney Citizen on Mar 8, 2011
By injeraadict on Mar 7, 2011
By Rachel on Mar 5, 2011
By NatureMama on Mar 3, 2011
By Ali-o on Feb 19, 2011
By Liz on Jan 10, 2011
By k on Nov 27, 2010
By Dabblertante on Nov 14, 2010
By Dabblertante on Nov 7, 2010
By dina on Oct 31, 2010
By a on Oct 18, 2010
I did some extensive research and till now have seen that it is indeed Gluten free. One of the places is here http://www.csaceliacs.org/gluten_grains.php. If you have a support to your claim pls do let me know
By Yesehak on Oct 14, 2010
By Barbara Becker on Oct 6, 2010
By Tricia on Sep 29, 2010
By deb on Sep 20, 2010
By Niv Mani on Aug 30, 2010
By Nicolas on Jun 24, 2010
Oh yes, you will have leftovers which you can use later on. But I went ahead and used them all by doubling the recipe of course :) If you go through the previous comments, you will know more about what to do with your leftover starter. Hope this helps :) --DK
By Parul on Jun 14, 2010
Hey Parul, thank u so much for your feedback. I def. add in notes for replacing ingredients wherever I am sure. But since I try other authentic recipes, I am forced to use the exact same ingredients like this Injera. It cannot be made in any other way other than with Teff flour. If you change the flour then the methodology changes like how you make regular indian crepes like Dosa, akki roti and rest. But I def. will keep in mind your suggestion and post more recipes which you can try with ingredients available back home. Do keep a look out on those :) --DK
By Mike on Jun 7, 2010
Oh yes! I think I did the same since I did not save my starter --DK
By Lin on May 5, 2010
By PJ on May 2, 2010
By Lin on Apr 30, 2010
I asked this query to Mary, from whom I got the original recipe. This is what she told me :) "Like any starter you want to store for a long time, I suggest you keep in the fridge. You don't have to feed it very often, about once a month. Feed it, toss off half and put it back in the fridge. I have kept my starter for over a year now in the fridge. To use it, take out of the fridge. Let it come to room temp. Feed it, toss off 1/2 feed it again. repeat until it is bubbly again. I only use it about once every three months and with a full four feedings, it revives nicely." - Hope this helps :) --DK
By Ming Diaz on Jun 20, 2019