Pumpkin Carving with free stencils by DK on Oct 11, 2010

With the Halloween spirit all around us (shops brimming with Halloween costumes,skeletons decorating houses,plastic spiders crawling all over the place), we couldn't help but get ourselves a pumpkin to start carving and get into a festive mood.
You might also be interested in:
15 fabulous Pumpkin Carving ideas for Halloween (with free printable stencils)
Simple, Easy and Spooky Ideas for Pumpkin Carving
We got ourselves a 10 pounder and set about carving it with the template supplied along with a pumpkin carving kit. If you have never carved a pumpkin before, then this following step by step pictures will show you how simple it is to get started. You can either choose to use free hand or like us use a template. We chose a cheeky smiling template for our pumpkin. Tear it out from the book (or if you have downloaded from net, simply take a print out and set it aside)

The very first step would be to draw and cut the lid off the pumpkin. We used the following tools which we got for pumpkin carving. But if you follow the pictures, you will find that they are doable with stuff from your house itself.

Prick holes around the lid - draw a circle - to help you to cut out the top easily.

Then slowly using the Saw tool, saw along the holes that you just marked.

As shown below, you can do the same, using your kitchen knife too.

Once you finish, this is how it looks like. You can make a larger lid if you please ( or as per your requirement)

Now slowly using the top stem, pull the lid out. A little force will be needed.

Once you pull, you will find yourself witnessing what looks like one of those million sea creatures you see in Blue Planet - Don't panic. Its the pumpkin fibers :)

You will see the fibers sticking with the pumpkin seeds - and boy! The seeds are abundant! This is where we have some real work to do!

Yes, you guessed right. Clean all those yucky looking membranes along with the seeds. The toolkit had something called as Scraper scoop to help us scrape the membranes and scoop them out of the pumpkin. You can use a metal spoon. Its a little back bending work and takes patience!!!

Once you scoop out the fibers and seeds - WAIT - DON'T THROW THE SEEDS AWAY! - We have something interesting we can do with those yummy seeds - yes, they are edible and nutritious. So keep it aside. Throw the membranes away.
You might want to check my: Roasted Pumpkin Seeds (Pepitas)

And yeah, clean out the bottom of the lid out too - see how clean the one below looks :)

Now remember the template which you set aside for later? Time to put it into action is now. Take the template - attach that pattern to the pumpkin making sure to choose the side without too many bumps - using cello tape to the edges. Also take care to avoid too many crease. A little here and there is fine.

We now used what is called as Pounce wheel to transfer the pattern to the pumpkin. You can use a fork to poke holes along the pattern, or a needle and I think a small fluted pizza cutter ( which is what this instrument resembled ) would also work. The purpose is so that when you remove the pattern from the pumpkin, you should be able to see the pattern on the pumpkin's surface too.

Once you finish, remove the pattern and dust some all purpose flour on top to enable the pattern to show for carving. Can you see our pattern on the surface?

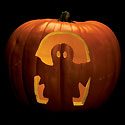
Then we used something called as a drill and a saw to puncture the surface along the dotted lines and carve the pumpkin.. You can use a small kitchen knife or a screw driver to do the same. I was in the middle of carving when i suddenly remembered that I forgot to take a picture. I left the tool pronto to take a picture and look what I saw! Doesn't my pumpkin look like its holding a cigar on its mouth!!!!! Looks more cheekier than ever!!!! ;)

Here we used the saw to cut out along the pattern that we carved. Make sure that you cut it deep enough so that you can remove that slab completely from the pattern. So saw it deep.

You can also use your fingers to poke its eye out !!!! ;) I mean push out the slab of the pumpkin once cut. If you find that it does not yield to the pressure then using a knife cut it a little more so that it gives in easily. The whole process takes little patience, a little back pain and some effort. But yes, totally worth it!

If you find that your Pumpkin does not sit well, you can cut a piece out at the bottom to help it to sit. Our pumpkin made itself comfortable without it! Admire the handiwork - there all done :) Look at the fella give you a smile ;)

And oh yes - not completely done until the sun has set and you have placed a candle inside the hollow ( remove the lid before that!), place the lid back and let it sit in your porch or wherever you decide to make it feel at home!

It was an amazing experience. Here's to amazing sculptors ( That's us by the way - if you were looking around wondering who I was talking about!!!!) and also to Halloween tradition. And here are some templates or pattern for you to try. They are all available in the net and I thought it would help fellow pumpkin carvers to try some out from this list.
 Download Flying Witch Pattern
 Download Galaxy of stars
 Download Boo the ghost
(source for the above stencils is Taste Of Home Website. Click to see more Free stencils)
 Download Grim Creeper
 Download Flack Jack Pattern
(source for the above free pumpkin patterns is Pumpkin Masters. Click to see more such free patterns)
There are million other sites like these which give you free templates. Here are few more which I found interesting:
- Carving Pumpkins
- Pumpkin Glow
- Pumpkin Carving 101 As the name suggests, I found the articles very useful in starting out my carving experience .
- Fabulous Living has some amazing looking patterns
Enjoy Carving Pumpkins :) This post finds its way to ITB:October with theme: Halloween
Recent Articles by ChefInYou
Ganesh Chavithi ( Vinayaka Chaturthi) Festival 2020 Recipes By DK on Aug 16, 2020
Krishna Jayanthi | Gokulashtami Festival Recipes By DK on Aug 8, 2020
OPOS Lessons: How to Standardise your Pressure cooker? By DK on Jan 28, 2019
6 things I never thought I will ever do! By DK on Aug 1, 2018
Super Bowl Recipes 2018 By DK on Jan 28, 2018
7 Ways OPOS® Cooking Improved My Life By DK on Nov 19, 2017
Prepping Staples – Planning my Weekly Menu By DK on Nov 13, 2017
6 Quick & Healthy After School Snacks (with Variations) By DK on Sep 6, 2017
Bell Peppers (Capsicum): Planting, Growing & Harvesting for Beginners By DK on Aug 9, 2017
OPOS® – Frequently Asked Questions By DK on Jul 21, 2017
Recent Posts by ChefInYou

Instant pot Applesauce By DK on Nov 30, 2020

Vegetable Pulao using RightRice By DK on Oct 28, 2020

Classic Oatmeal using Sprouted Rolled Oats By DK on Oct 21, 2020

Pita Tostada By DK on Oct 14, 2020

Green Chutney / Hari Chutney (Chaat) By DK on Oct 7, 2020
Leave a Reply
I love to hear from you! I read each and every comment, and will get
back as soon as I am able to.
19 Comments
By The Make Your Own Zone Saturday Link List - Homemade Halloween Ideas - The Make Your Own Zone on Aug 9, 2012
[...] for good step-by-step instructions for carving a pumpkin, check out this Stencil Pumpkin Carving Tutorial with lots of pictures for [...]
By The "Make Your Own" Zone Saturday Link List - Homemade Halloween Ideas - The "Make Your Own" Zone on Jul 27, 2012
[...] for good step-by-step instructions for carving a pumpkin, check out this Stencil Pumpkin Carving Tutorial with lots of pictures for [...]
By pavithra on Oct 12, 2010
Beautiful dhivya....
By Preeti on Oct 11, 2010
Lovely dear.... Nicely demonstrated... thanks for sharing :-|
By Priya Srinvasan on Nov 10, 2009
hey DK, here's the link of my pumpgrin, have a look. Lemme know, how is it???
http://enveetukitchen.blogspot.com/2009/11/my-pumpgrins.html
They are beautiful Priya. I have added them to my Carving Ideas post --DK
By Namratha on Oct 19, 2009
Nicely done DK, carving is an art in itself, good job!
By CouponQueen on Oct 17, 2009
Thank you very much for this! Also, if you are interested you should really pick up Extreme Pumpkins. I bought it last year and i was able to create some of the best pumpkins i’ve ever made. I just looked, and apparently it’s on sale at amazon right now! http://dealassasin.com/deals/hot-deals/40-hot-deals/4574-extreme-pumpkins-book-1116-amazon.html
By Veggie Belly on Oct 13, 2009
this is awesome! love the tutorial and the stencils!
By Soma on Oct 10, 2009
you have some patience to take picture:-) A very cute one!
By Free Pumpkin Carving Patterns for Halloween on Oct 8, 2009
[...] just turn your pumpkins creations into squash with one swift kick of a shoe or two. See also Pumpkin Carving with free stencils Free Pumpkin Carving Patterns Easily carve a spooky pumpkin with these free Halloween stencils [...]
By Doli on Oct 8, 2009
Hey I also wanted to try ... can you post your stencil please?
Hi Doli, unfortunately I got this template from a book which came along with the toolkit we bought for carving the pumpkin. I will see if I can find the same for you online and will post it once I do. Thanks for your interest :) -----DK
By Joanna in the kitchen on Oct 8, 2009
Thank you sooo much for sharing the whole concept of carving a pumpkin with us step by step. Everything that always was difficult to be seems a piece of cake now. It will be soooo helpful very soon.
By singh b on Oct 8, 2009
oh it's so easy .............basicaly we are using this for The world-famous Half Moon Bay Art & Pumpkin Festival but we can use it for diwali also ............
By Johanna on Oct 8, 2009
these look fantastic - I have only done very basic pumpkins once before but this is quite inspiring stuff and useful advice - thanks
By Divya on Oct 7, 2009
Amazing Div..that looks like a lotttt of effort..:).Love the cigar smoking pumpkin..:)
By Pavani on Oct 7, 2009
Very interesting.. Never tried carving a pumpkin.. looks like fun.
By Priya on Oct 7, 2009
Fantastic pumpking carving...
By Divya Vikram on Oct 7, 2009
So pretty Dhiv! Love the pic with the cigar!
By Jayanthi J on Aug 14, 2012