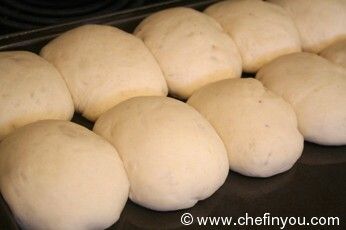
White Dinner Rolls (Indian Pav) by DK on Dec 20, 2009
 recipe")
 recipe")
- Cook time:
- Prep time:
- Yields: Makes around 12 rolls or pavs
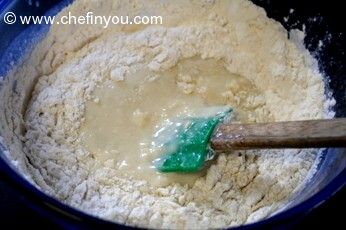
- 3 cups Bread flour plus few more for dusting (See Tips)
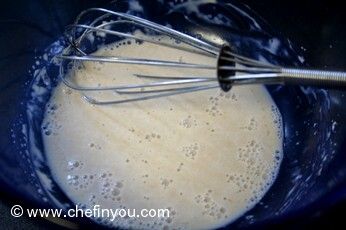
- 2-1/4 tsp Active Dry Yeast
- 1/4 cup lukewarm Water
- 1-1/4 cups milk ( replace 1/4 cups with 1 beaten egg if you prefer)
- 3 tbsp Butter
- 2 tbsp Sugar
- 3/4 tsp Salt
If you want to Bake using Microwave pls refer to these articles:
1) How to Bake in Microwave
2) How to Bake in Microwave Convection Oven
For making Substitutions please refer my handy chart:
1) Baking substitutions
2) Egg Substitutions


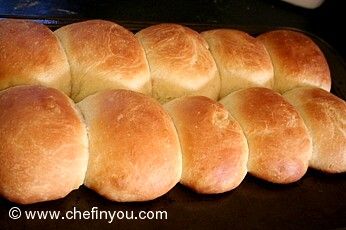

 recipe") They can be very beautifully pulled apart to make single serving.
They can be very beautifully pulled apart to make single serving.
 recipe")
Filed Under these categories
- 226 American
- 190 Appetizers
- 37 Baked Goodies
- 154 Baking
- 8 Breads
- 240 Breakfast
- 177 Christmas
- 287 Course
- 366 Cuisine
- 39 Eggless Breads
- 180 Indian Recipes
- 705 Kid Friendly
- 94 Occasions
- 50 Starters
- 27 Street Foods
- 245 Thanksgiving
- 28 Yeast Breads
Ideal Accompaniments

6 minute OPOS Pav Bhaji By DK on Feb 18, 2018
Recipe Reference
my kitchen notes (original source misplaced)
Related Posts
6 minute OPOS Pav Bhaji By DK on Feb 18, 2018

Spinach and Cheese Lasagna Rolls By DK on Nov 24, 2014

Pav Bhaji Fondue By DK on Apr 1, 2015

Paneer Cigar Rolls By DK on Jul 12, 2010

Egg Bhurji Pav By DK on Feb 23, 2015

Paneer Moong Kathi Roll (Falka Roti) By DK on Nov 3, 2014
Leave a Reply
46 Member Reviews
By richa on May 24, 2014
Hi,
I made this receipe twice and both the times my top was very hard and the bread very dense.i followed the recepie as per the instructions but still cannot make it upto the mark. I used oil instead of eggwash Buti would appreciate if you could guide me with the size of rolls needed to be rolled out and how much should be the resting time of the dough and after we make rolls how much time they should be left before baking.
By Nisha on May 21, 2014
Lovely recipe!! My family was delighted to find that we can make all sorts of bread at home, without using egg!! :D
Well, I had to make my pav in two batches. The first batch came out very well, the colour, shape and taste.. The second batch, turned out slightly undercoloured and didn't taste quite the same, that may be because I left it too long (2 hours!!) after making small portions. I'll take care next time!
Also, I used all-purpose flour(maida). I used nearly 3 and a half cups, but not too strictly. I sized it according to how much was needed. Though I didn't know how long I had to knead the bread (like, what to look for to know I have to stop), I enjoyed the kneading part; the dough was so plushy! I had to leave it for a good half hour to rise. My oven needed nearly 45 minutes to an hour, as opposed to the 30 minutes, in the recipe.
All in all, I got good results! Hoping to improve in my next try!
Cheers!
159 Comments
By Nancy on May 5, 2016
By Brittney on Apr 22, 2016
By Vidhya on Feb 5, 2016
By Vidhya on Feb 4, 2016
By vidhya on Feb 4, 2016
It is 1 and 1/4 cup milk --DK
By Pav Bhaji | The Schizo Chef on Jun 3, 2015
By Indian Pav Bun | Dinner Rolls | Home Style Veg Food on Apr 17, 2015
By Pav Bread Recipe – The Indian Burger Bun for Pav Bhaji | Edible Garden on Dec 8, 2014
By muskaan on Nov 7, 2014
By Smita Raut on Oct 31, 2014
By manali on Aug 21, 2014
By anonymous on Aug 3, 2014
By mansi on Jul 27, 2014
By Neha on Jul 11, 2014
By Mona on Jul 8, 2014
By Trashy Mathur on Jun 30, 2014
By Shraddha on Jun 3, 2014
By Chamu on May 24, 2014
By Chamu on May 24, 2014
By Priti Gokani on May 24, 2014
By richa on May 23, 2014
By sharmilla on May 23, 2014
By Priyanka chowdhary on May 23, 2014
By Akansha on Apr 30, 2014
By Preethi on Apr 23, 2014
Hard surface is cos you overbaked it. Its possible you waited until the top looked brown. Egg wash usually gives that classic bakery shone, anything else tends to provide a pale color. --DK
By Ritika shah on Apr 15, 2014
Bread flour is not same as Maida. Bread flour makes excellent breads but you can use all purpose /maida as well. Using just Wheat flour will make for a dense bread. --DK
By Aida Zare on Feb 14, 2014
By Darcy on Jan 19, 2014
By Jessica on Dec 20, 2013
By archana das on Dec 11, 2013
By Sowmya on Nov 12, 2013
By radharamesh on Nov 11, 2013
By geetha harish on Nov 8, 2013
By geetha harish on Nov 8, 2013
By jannat on Nov 7, 2013
By Anusha on Oct 14, 2013
By Aparna on Sep 1, 2013
By Kirti on Aug 23, 2013
By Christine on Aug 16, 2013
By krish on Aug 12, 2013
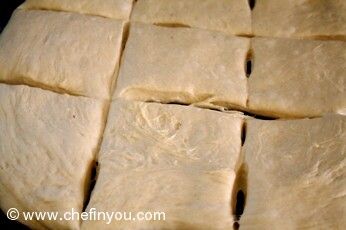
Pls refer step 11 --DK
By Kavita on Aug 5, 2013
By RashPilot on Jul 15, 2013
By Patel on Jul 2, 2013
Two possible reasons -1) The dough did not rise. And/or 2)Baked it too long or in too high heat. --DK
By shweta on May 27, 2013
By Liza on May 27, 2013
By deeba on May 22, 2013
By deeba on May 22, 2013
By deeba on May 22, 2013
By Sneha on May 18, 2013
Really? Never knew that flour comes with yeast already packed in!! How do they know how much yeast to add? Are you sure about that? Wud luv to know more info --DK
By imtinan butt on May 1, 2013
By Indian street delight : Vada Pav | Food & other magical things on Mar 19, 2013
By mittu on Mar 15, 2013
By How a Vada Pav turned into Cinnamon Sugar Pull-Apart Bites | Any Excuse to Write… on Mar 1, 2013
By Pepper on Feb 12, 2013
By Siri on Feb 11, 2013
By Rhonda on Feb 6, 2013
By Ranjana on Jan 30, 2013
Please refer my Tips section below ingredients --DK
By Prachi Desai on Jan 28, 2013
By Neha on Jan 17, 2013
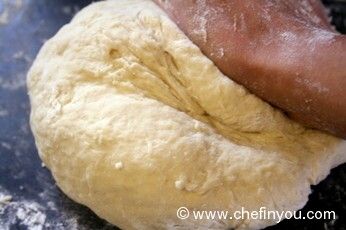
Technically I would just make an equal substitution or add 2-3 tbsp more all purpose flour. But few people who have tried making this with all purpose tell me that they needed 2-3 cups more. Given that I personally haven't tried with all purpose flour for this recipe, I have to go with what they say. I wud suggest trying equal and/or plus 1/4 cups and then take it from there. I also have a nagging doubt that there might be instances when people add more flour than necessary. The dough should be lightly sticky to begin with but if you knead it well it will be replaced with elastic and smooth dough. And this, in my opinion makes for a delicious fluffy bread. --DK
By eric on Jan 10, 2013
By Around the Web: Dinner Rolls | SocialCafe Magazine on Dec 7, 2012
By Terri on Nov 3, 2012
By 10 Thanksgiving Dishes to Make as a Family - Cherished Bliss on Oct 31, 2012
By Dabeli/ Indian Dinner Rolls with spicy potato curry « foodiliciousnan on Oct 16, 2012
By Homemade Dinner Rolls/Pav Buns & How to activate yeast « foodiliciousnan on Oct 16, 2012
By sush on Aug 21, 2012
By prachi on Aug 21, 2012
By nags on Aug 20, 2012
By Prady on Aug 19, 2012
Wheat flour does make the end result dense. But since you used Atta which in my opinion is equal to whole wheat pastry flour, it should not be as dense as using regular wheat flour. If your dough rose well, then it should be spongy. Kneading is always good for developing gluten. Another thing - for the browning, applying a thin coating of butter or egg wash would get it browned better than baking it longer :) --DK
By Aarti on Aug 18, 2012
If its hard, then you are over baking it. May be your oven is getting heated faster (and higher) than 350. Reduce the temp or bake for a shorter time and see if it makes a diff. --DK
By Liz on Aug 15, 2012
I think its the Oven. I personally dunno about the numbers but I located this in the Internet - http://www.onlineconversion.com/cooking_gasmark.htm. Is this what you are referring to? Hope it helps if it is. --DK
By seetha on Aug 8, 2012
By Raji on Aug 7, 2012
Thanks a bunch Raji for the feedback. I am so glad you liked it :) Now I am craving Pav Bhaji :( --DK
By Reshu on Aug 5, 2012
I think you baked it longer than it required (and/or it was close to the heating element) --DK
By CS on Jul 25, 2012
By ry on May 28, 2012
By Vada Pav — A Step by Step recipe for pav bread and pan fried vada » Sizzlingveggies on Apr 21, 2012
By Bhavana on Apr 5, 2012
You shouldn't get an yeasty smell. I have heard that you would get in case where one uses more yeast or let the dough ferment for way too long. To get the golden brown color on your rolls, brush them with egg wash or use butter before baking. --DK
By rose on Mar 9, 2012
By Sara on Feb 6, 2012
By Anushka on Feb 3, 2012
Of course! The title says "Pav" not "Pav Bhaji" --DK
By Preetika on Dec 2, 2011
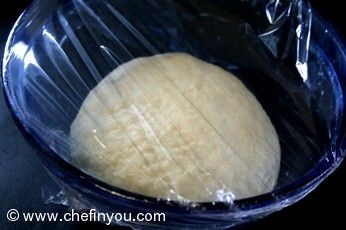
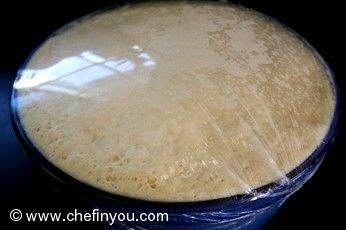
Anywhere between 2 to 4 hours depending on the weather/humidity of your place
By SUNITA on Nov 2, 2011
By Viji on Oct 19, 2011
By Caroline on Aug 27, 2011
By Gautami on Aug 11, 2011
By Abdul hamid on Jul 13, 2011
It is 2-1/4 "TSP" (teaspoons) and not "cups". Yes it is 2 tsp + 1/4 tsp.
By sana hamid on Jul 11, 2011
By Yogesh on Jun 26, 2011
Brush some butter on top of the pav before baking for the color. If you are OK with eggs, then brushing it with egg wash (1 egg with 1 tsp water - beaten) which will give it a golden brown color. There wont be any eggy taste to the finished product.--DK
By sarika mehta on Jun 12, 2011
By vinaya on May 4, 2011
By Najma on Apr 28, 2011
By vinaya on Apr 27, 2011
Did you use All purpose flour or Bread flour? The bread flour makes it v light and gives it that amazing spongy texture
By sunitha on Apr 19, 2011
No, the all purpose flour still makes a spongy bread (not as well as bread but with a wonderful texture nevertheless) Possibly 2 reasons. 1) Over baking 2) The dough was not risen enough. Did your dough rise well ?
By Neetu on Mar 29, 2011
Really!?I am surprised to hear that. I have tried it so many times and also as you can see many CIY members have tried this recipe too. I have never had this issue..
By Michelle on Mar 11, 2011
Guess the bread flour and all purpose flour make the difference..Try adding the liquid little by little next time
By Ashu on Feb 27, 2011
Thank you so much for the kind words. Made my day :) For the browning on top, brush the top with butter/one beaten egg. It will give it a shiny golden brown finish. The hardening of the first batch could be cos of 2 reasons - "Too much heat that the bottom cooked faster then the top", "Baking for too long".
By Pav Bhaji « Jean’s Page on Jan 28, 2011
By Niv on Dec 19, 2010
By Deepa on Nov 8, 2010
By Priya Nambiar on Sep 30, 2010
Its hard to pinpoint a time limit since the weather/humidity/season in your area will decide that. It can take anywhere between 45 minutes to another hour and a half for second rise
By Priya Nambiar on Sep 30, 2010
Please refer to the substitution link I have provided in the Ingredient section for further clarification for substituting yeast
By Mia on Sep 11, 2010
I used Fleischmann's Rapid Rise Yeast
By Kavitha on Jul 29, 2010
I use an US cup which is 240ml
By mamta aggarwal on Jul 26, 2010
You can use "Email to a friend" link just below my post to send a copy of this to your mail :)
By sudhashrikanth on Jul 20, 2010
There can be two possible reasons - 1) Your oven temperature was too hot. So it cooked fast and hard without properly baking it. 2) The dough did not rise well. Usually its the yeast action which brings that texture of sponginess. 3) The color on top can be achieved in two ways - by applying some beaten egg on top or melted butter which gives it that rich brown color.
By renuka p on Jul 13, 2010
By SUNITA on Jul 13, 2010
By renuka p on Jul 3, 2010
I am not sure of the machine was the cause, I wud think its more the quality of the flour. Yes, I think adding the milk as needed , slowly as you are kneading would surely help :)
By satya on Jun 22, 2010
By satya on Jun 22, 2010
To answer both your questions : Yes, you can substitute with rapid yeast. In that case, just add the equal measure of rapid yeast to the flour directly. There is no need to proof it in the water like for active yeast. Lukewarm water varies depending whether you are using active yeast/Rapid yeast. Just check your package - it will give you the temperature with which you need to warm your liquids. Also You dont need to rise the bread twice like I do in this recipe. Only once is usually enough in Rapid Rise yeast. Hope this helps :)
By satya on Jun 22, 2010
By nags on Jun 13, 2010
By lalitha on May 30, 2010
Hey lalitha, Thanks for your feedback. I have sent you a mail. As for the query, of course you can try adding masalas or even stuffing to the recipe to give it a savory twist. Get creative and wild - it will surely work cos its v flexible recipe. As for as substituting wheat flour goes, to get the same sponginess would be a tad difficult. But you can use the substitute guideline I have provided here: http://chefinyou.com/2009/07/substitutes-in-baking-101/. Here in the US of A you get something called as "Wheat Gluten" which is nothing but wheat protein extracted while grinding the wheat into flour (usually its ground away and wasted). Its immensely healthy and protein rich. Adding a tablespoon of that whenever you use wholegrain in baking gives it that amazing texture similar to all purpose flour. If you don't find its fine - try the substitution table to try with wheat flour. Hope this helps :) --DK
By Roopa on May 10, 2010
The doubling and yeast action depends on the climate you enjoy. The more warm and humid it is, lesser the time like say 40-45 minutes. The cooler and lesser the humidity more the time - say around 1-1:30 hrs. :) --DK
By Gaya on May 7, 2010
By mahek on Apr 30, 2010
By Valleri on Apr 20, 2010
By RJ on Apr 17, 2010
Thank you so much RJ - luv these rolls myself. Do lemme know what went wrong with Khaman - may be I can help? :)--DK
By Gayatri on Apr 16, 2010
Thank to you, I just realized that my comment for Deepali seems to be missing for some reason inspite of me remembering to answer hers! Anyways - the hard getting hard is owing to the Oven temperature. It means that your base cooked way faster than the rest of the rolls. You can try the following options - 1) Reduce your oven temperature next time. Suppose I say 350 for 20 min try 300-320F for 30-40 minutes. 2) Another method is placing your baking sheet on another baking sheet - double base so that your sheet doesnt get as hot as with a single one 3) try placing your baking sheet on top rack instead of the bottom one (in short as far away from the heat source). Since all Oven temperatures are not alike ( electric, gas, company make, outside weather), do adjust it accordingly. Hope this helps :) --DK
By Anne on Apr 9, 2010
By pratima on Apr 8, 2010
By Deepali on Mar 29, 2010
That could be cos you placed the baking tray in your lower rack or cos of your too much heat from the oven. Just place these in double sheets. That is, place another baking sheet, one top of the other and bake them. That way the heat will not get harsh for the bottoms to burn. Hope this helps --DK
By Poonam on Feb 26, 2010
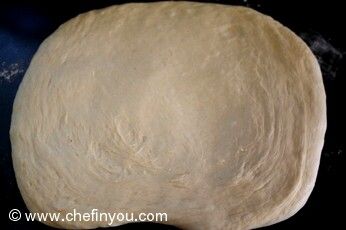
If you are using white flour, then it will double in size (the original recipe will mention it). If it is wheat flour, the rise will be v less but if you touch the dough after resting and it springs back, then its ready :) --DK
By Kalpakam on Feb 24, 2010
Yes, bread flour has more protein and it gives beautiful spongy texture to all yeast based breads. You can certainly use All purpose flour instead of the bread flour - the results will be little less spectacular than with bread flour. If you can get your hands on Vital wheat gluten, you can add 1 tbsp to the all purpose flour to achieve that fabulous texture.:) --DK
By hema on Feb 23, 2010
By Gunjan Dhingra on Feb 19, 2010
Just brush them with little beaten egg/ melted butter before baking them. That gives the color. I am not too sure about the M/W though since I have never made anything in it. Hopefully it might just work with m/.w too :) Thanks for your beautiful feedback. Glad to hear that :) --DK
By Melvin Williams on Feb 14, 2010
By Hetal on Feb 11, 2010
By NB on Feb 10, 2010
Hi NB - thank you so much for the feedback. I am glad that it came out well enough to break ur myth! I am sure this is just the beginning of many many more to come :) --DK
By BB on Jan 18, 2010
Thanks BB :) The rolls will continue cooking for few minutes after you remove them from the oven. That's why you will find most recipes call for resting period. The one you removed earlier - that would have been completely cooked if you had let it sit for few minutes after removing from the oven. So next time you find them turning brown, just remove from the oven and let them rest outside for few minutes. Then see - it would be perfect :) --DK
By Sana on Jan 12, 2010
By Rashmi on Jan 10, 2010
I think it has to do with the oVen..raising the heat can also make the bottom the burn faster before the it cooks....Keep the rack on top level and do the same....check to see if this works --DK
By Pravs on Jan 7, 2010
By Sana on Jan 7, 2010
The commentator just meant Baked. Egg wash helps to give color to your baked goods and has nothing to do with softness. As for that I can think of only 2 possible reasons - 1) The flour - Did u use bread flour or all purpose flour? The bread flour helps to give it even more softer texture than all purpose although that really should matter at all in this case since I have tried with both of the flours and they have come out almost equally soft. 2) Did the dough rise? A good rise is mainly the cause for softness...did you let it rise twice like I mentioned in the recipe? ---DK
By Sana on Jan 7, 2010
Steam bread? I did not understand your question Sana - can you explain what you are looking for? --DK
By palatable on Dec 30, 2009
By meeso on Dec 27, 2009
By Deepali on Dec 24, 2009
Add it in the first step along with the yeast. Beat the eggs first then add it to the yeast, water and sugar mixture. --DK :)
By María on Sep 6, 2016
Did you use Bread flour or All purpose flour? If the latter, then can you please refer to my Tips section right below ingredients --DK