How to Carve Extreme Pumpkin for Halloween by DK on Oct 27, 2013

Its quite funny how some of the most intimidating things are pretty simple if you really think about it. This year, we wanted to push our comfort zone from carving template/stencil based pumpkins to something a little more complex. This year, we decided we will tackle it to see for ourselves. Guess what - the process was a lot less intimidating (though that can't be said for the pumpkin itself).
See also:
1. How to Carve a Simple Halloween Pumpkin Using Templates/Stencils
2. Simple Pumpkin Carvings Ideas
3. 15 Fabulous Pumpkin Carving Ideas for Halloween
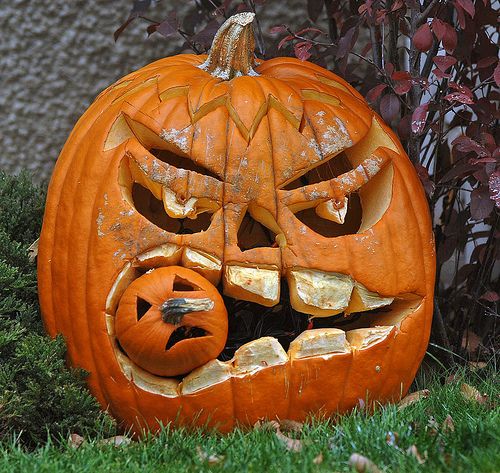
The below pumpkin from Extreme Pumpkins has been on our mind for quite a while. We were inspired to try something on the same lines and we did a little bit (ok , a wee little bit) of our own touches.

In case, like us, if you have been meaning to make something like this but have been putting it off for some reason or the other - here is a tutorial to help you kickstart the process. We got 2 pumpkins - one gargantuan in size and one pretty small. I have placed a Samsung Galaxy S3 to give you a rough estimate. But pretty much any pumpkin can be customized to your needs.

| Next we drew a rough sketch of the face we wanted on top of the pumpkin. |
 |
| Likewise for the small one (which we needed in this case as a part of the whole picture) |
 |
| Next using the pumpkin carvings tool (you get basic simple ones everywhere - we did not use any fancy gadgets), just carved on the lines. We started from the top. |
 |
| Once cut, slowly try to pry it off. If stuck to the ends, poke along the lines to loosen it. |
 |
| Also the fibres in the pumpkin might be holding them as well. So slowly work your way out. |
 |
| Next step would be remove all those fibres and seeds. |
 |
| We used a scoop to do the job. We set aside some of the fibres and threw the rest away while I picked out the seeds to make us some Roasted Pumpkin Seeds later |
 |
| Repeat likewise for the "head/crown". Set aside. |
 |
| Next we started on the mouth. |
 |
| Carved along the lines |
 |
| and remove the cutout portion. |
 |
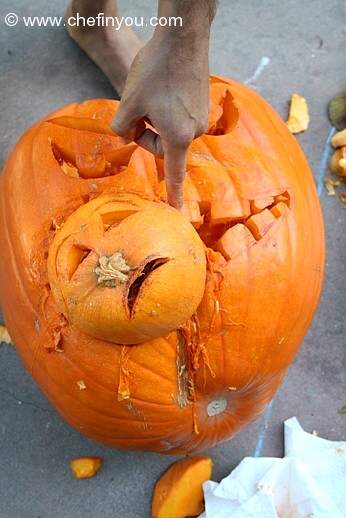
| From the top, we placed the little pumpkin inside to see how much hole was needed to fit the little guy. |
 |
| Based on that, we trimmed some more - mostly towards the bottom than from the top 'cos of lack of space on the upper end. |
 |
| While that got done, we next started on the eyes. |
 |
| Carved out the eye brows |
 |
| and then the nose. |
 |
| The eye part was a little trickier, since you needed to keep the eye ball intact without it breaking but remove the surrounding (except the top). |
 |
| So make sure to reinforce it from the inside so that the eye ball doesn't break. Of course - Take care of your fingers so that you don't hurt yourself while carving. |
 |
| We had to trim the little pumpkin to fit it in but it looked mostly done at this point. |
 |
| So we started on the teeth. |
 |
| We took some of the fibre and let it hang from the mouth to depict flesh and organs! |
 |
| Then we carved the little pumpkin. This is of course much simpler given how straightforward it is. |
 |
| The eyebrows and eyes |
 |
| and then the mouth |
 |
| which we then fixed for good in the mouth of the bigger pumpkin, making sure that the little pumpkin was pretty snug fit. |
 |
| Replaced the crown |
 |
| and then out came our painting box. We painting the eyes red along with a dark outline. We also painted the fibres red along with the outline of the mouth of the bigger pumpkin to depict blood. |
 |
| All we needed at this point was some contrast |
 |
| that was provided by some white paint which was used to provide color for the teeth. |
 |
| Our pumpkin is all set , and utterly gruesome even during the day, |
 |
| to welcome the little guests. Now, wasn't that simple?? |
 |
Browse By these popular categories
- 154 Baking
- 287 Course
- 366 Cuisine
- 206 Healthy Foods
- 44 How to's
- 6 Instant Pot Recipes
- 1 Kid Friendly Recipes
- 94 Occasions
- 18 OPOS- One Pot One Shot Recipes
- 1 Slow Cooker Recipes
- 24 Special Diets
- 3 Student/Bachelor Cooking Recipes
Recent Articles by ChefInYou
Ganesh Chavithi ( Vinayaka Chaturthi) Festival 2020 Recipes By DK on Aug 16, 2020
Krishna Jayanthi | Gokulashtami Festival Recipes By DK on Aug 8, 2020
OPOS Lessons: How to Standardise your Pressure cooker? By DK on Jan 28, 2019
6 things I never thought I will ever do! By DK on Aug 1, 2018
Super Bowl Recipes 2018 By DK on Jan 28, 2018
7 Ways OPOS® Cooking Improved My Life By DK on Nov 19, 2017
Prepping Staples – Planning my Weekly Menu By DK on Nov 13, 2017
6 Quick & Healthy After School Snacks (with Variations) By DK on Sep 6, 2017
Bell Peppers (Capsicum): Planting, Growing & Harvesting for Beginners By DK on Aug 9, 2017
OPOS® – Frequently Asked Questions By DK on Jul 21, 2017
Recent Posts by ChefInYou
Instant pot Applesauce By DK on Nov 30, 2020
Vegetable Pulao using RightRice By DK on Oct 28, 2020
Classic Oatmeal using Sprouted Rolled Oats By DK on Oct 21, 2020
Pita Tostada By DK on Oct 14, 2020
Green Chutney / Hari Chutney (Chaat) By DK on Oct 7, 2020
Leave a Reply
I love to hear from you! I read each and every comment, and will get
back as soon as I am able to.


By Alice on Oct 25, 2014