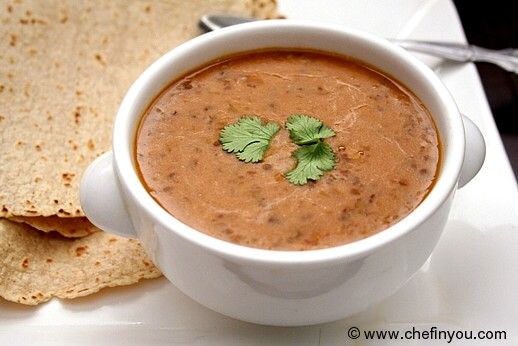
Slow Cooker Dal Makhani by DK on Nov 17, 2016

Depending on the type of the day, you would find me either running around with my pressure cooker making OPOS® Recipes where everything gets done under 8-10 minutes; or taking out my slow cooker the previous night so that I am greeted with lunch when I wake up in the morning. I am already working towards making my New Year 2017 resolution a success. Yeah, you heard me right :) I love making lists and New resolutions do work for me. My aim for the next year involves cutting down on restaurant food substantially and for that purpose I need to make it easy for myself to accomplish it.

I hate cooking the previous day for next meal (freshly made food every meal), I find slow cooking satisfies that criteria as well making sure that I can prioritize things accordingly without having to rush at last minute. Many Indian foods are easy to make using slow cooker and requires almost no attention from me. This Dal Makhani is among such and in fact I find it embraces slow cooker very well. The flavors get deep and the texture becomes rich and creamy without addition of too much butter/cream. This is the way I make mine.
- Cook time:
- Prep time:
- Serves: Makes enough for 4-5 people
- Yields: Around 5-6 cups
Ingredients
- For the Dal
- 1 cup Whole Black Lentils (Urad dal)
- 1/4 cup Bengal Gram
- 1/2 cup Kidney Beans
- 1 Bay leaf
- 1/2 tsp Turmeric Powder
- 2 inch Ginger, peeled
- 4-5 Garlic Cloves, or as needed
- For Tempering
- 3 tbsp unsalted Butter (or Homemade Ghee or Coconut Oil)
- 1 tsp cumin seeds
- 1-2 Green Chillies sliced thinly, or as needed
- 1/2 tsp Cumin Powder
- 2 tsp Coriander Powder
- 1 medium Red Onion
- 1 large Tomato, chopped
- Salt to taste
- For Garnish
- 1 tsp dried Fenugreek leaves ( Kasuri Methi )
- 1 cup Cream, or as needed (Or use Coconut Milk/Cream for Vegan option
- Cilantro to garnish
Method
1.
Soak the lentils and kidney beans overnight. While it is not necessary when using a slow cooker, I find soaked legumes make for better digestion. There is a worry that slow cooker does not cook the kidney beans completely. It's said that undercooked kidney beans is toxic. I usually add boiling hot water to soak the legumes and have found it to be well cooked when using the slow cooker. But if it still concerns you, boil the kidney beans for 10 minutes before adding it to the slow cooker. Or simply use canned kidney beans towards the end of cooking.

2.
Drain the soaked lentil mixture and add it to the slow cooker. You can coat the slow cooker insert with oil but its optional.

3.
Add 4.5 cups of water

4.
and set the slow cooker to setting of your choice. When I am cooking overnight, I cook in low (8-10 hrs), but if its during the day (say around noon for dinner), I choose the High (4-5 hours) option.

5.
Add turmeric, bay leaf, ginger and garlic. These help in digestion as well reduced or no flatulence that usually follows consuming legumes.

6.
Close the lid. For this post, I was doing it during lunch time for dinner. Hence used High setting

7.
This is how it looks around 3.45 hours. [When cooked Low for 8 hours, it's always completely cooked] The lentils are completely cooked and kidney beans 99% cooked with a very slight bite to it. I continue cooking it.

8.
You can choose to mash it with a spatula, but I just run my hand processor few times to mash it a bit.

9.
That way it also helps to thicken up the dal. See its thick with a nice texture to it. Close the lid and continue cooking.

10.
While that's happening, I cook the aromatics on the side. In a hot pan, add required amount of Ghee/butter. This is traditional but you can choose to just add a little bit of oil as well. Add the cumin seeds and once it starts spluttering, add the chopped onion along with the chillies.

11.
Once soft - around 1 minute mark, add the chopped tomatoes.
[Tip: To save yourself even more time, you can choose to saute onions very lightly right in the beginning and add it along with the dal for cooking. Then in the last one hour of cooking, I would add 1 cup of tomato puree to the dal. I find adding acidic ingredient right in the beginning, does not cook the dal well and it get tough while cooking. Hence I would add salt and tomato towards the end of cooking]
[Tip: To save yourself even more time, you can choose to saute onions very lightly right in the beginning and add it along with the dal for cooking. Then in the last one hour of cooking, I would add 1 cup of tomato puree to the dal. I find adding acidic ingredient right in the beginning, does not cook the dal well and it get tough while cooking. Hence I would add salt and tomato towards the end of cooking]

12.
Saute for another minute till it gets soft and then add all the spices along with salt.

13.
Cook for a minute or so until the tomatoes break down. Can add few teaspoons of water to avoid the spices burning. This total sauteeing of onion and tomatoes should not take more 5-6 minutes in med-high heat.

14.
Add this mixture to the dal

15.
and give it a good stir. Taste and adjust seasoning if needed and let it cook for another 30minutes or so. If you are in a time crunch, you can keep the setting on high and cook for another few minutes. But if you still have time, let it simmer in low until serving time. I find that the more it cooks, better the flavor and texture.

Add cream right towards the end. I usually skip it 'cos I don't miss it at all. I garnish some fenugreek leaves along with cilantro before serving hot/warm with roti(s) and rice.

Filed Under these categories
- 291 Dairy Free
- 21 Dals and Kadhis
- 46 Easy Side Dishes
- 447 Gluten Free
- 705 Kid Friendly
- 61 Kids Lunch Box Recipes
- 55 Kids Main Course Recipes
- 384 Nuts Free
- 100 Side dishes
- 1 Side Dishes
- 1 Slow Cooker Recipes
- 177 Sugar Free
- 499 Vegan Recipes
Ideal Accompaniments

Jamaican Coconut Okra Rice By DK on Jul 30, 2018
Related Articles
Recipe Reference
My recipe notes
Related Posts

How to cook Kidney Beans in Instant pot { No Soak | Presoaked Options } By DK on Jul 1, 2020

Four Bean Salad By DK on Oct 23, 2012
Kidney Beans and Rice By DK on Dec 3, 2010

Rajma Chawal (Kidney Beans Rice) By DK on Jun 30, 2010

Instant Pot Pinto Beans { No Soak | Presoaked Options } By DK on Aug 12, 2020
Dal Makhani By DK on Feb 25, 2011
Leave a Reply
I love to hear from you! I read each and every comment, and will get
back as soon as I am able to.
3 Comments
By Priya on Jan 4, 2017
Hi, I have always loved your website. Its simply the best. I have been your silent reader since many years as like thousands of other readers who occasionally land up on your website for searching different recipes & reading knowledgeable articles. I would like to inform you that I am feeling sad about few of your past articles which I loved are not available due to some technical problem from your side. Here's the links for few of such articles regarding Ragi millet. http://chefinyou.com/2009/06/03/how-to-make-ragi-flour-finger-millet-flour-at-home/ , http://chefinyou.com/2010/01/25/ragi-recipes/ , http://chefinyou.com/2009/05/15/how-to-sprout-raagi-finger-millet/ .
I hope you will resolve this issue & bring back those pages once again! Thanks
Thank you so much Priya for bringing this to my notice. Will rectify soon. --DK *UPDATE: Just fixed the links. You should be able to see them now :) Thank you once again
By Bindia Indisk Takeaway on Jan 3, 2017
This recipe looks so delicious one of the Indian Punjab's recipe. Your method is so unique thanks for sharing.
By Janet Kiernan on Feb 20, 2017
You can use it either way Janet. I use it whole to flavor the cooking water for the legumes. But I realised that I have skipped mentioning that you can remove the cooked Ginger once the legumes are cooked. The garlic gets smashed, but I generally remove the ginger since it does not mash up well using the hand blender. To make it simpler, just chop them into small pieces before dropping it into the water. --DK